Family |
The Trains |
Wargames |
Mike's Stuff |
Heaven? |
- | E-mail me |
My Layout |
Trackplans |
MRR Humor |
MRR Advice |
Plan Errors |
Christian RR |
Misc & Links |
Family |
The Trains |
Wargames |
Mike's Stuff |
Heaven? |
- | E-mail me |
My Layout |
Trackplans |
MRR Humor |
MRR Advice |
Plan Errors |
Christian RR |
Misc & Links |
When I design a layout, I almost always have something more in mind than "how much track can I jam into a limited space." I try to make layouts where trains can operate and train-lovers can have some fun. I also make a point of setting some space aside for structures and scenery, which seem to be nothing but afterthoughts in a lot of plans for small spaces.
Color Code for the trackplans: (this information is also included with each trackplan file)
Mike's Tip: Nail & glue a strip of coved molding around the edges of your module or small layout. It adds almost nothing to the layout's weight or footprint, but it gives you about 5/8" extra width on each side - enough for an N scale ground throw or some basic trackside scenery.
To download a trackplan file, right-click on its image and choose Save Target As. Trackplans are .RAL files (Right Track Software), stored in .ZIP format along with color-coded images, an explanation of the color codes, and a bill of materials.
| The Trackplans | ||||
|---|---|---|---|---|
| 2x4' layouts | Smaller layouts | Door layouts | Other people's plans | HO scale tiny plans |
I used Atlas Right Track software v8.0 for these plans; this old version has been superseded. Because it was a free download then, I hope there is no problem with me continuing to offer it for free now. This copy was originally from the atlasrr.com site; I offer it as-is, as a convenience for anyone who wants to play with my trackplan files. I cannot accept any responsibility or liability for use or misuse of this software, and I do not offer technical support or any other assistance in using it. The user accepts all responsibility and liability for the software and its effects. This software runs on Windows XP, Vista, and Windows 7; I do not know if it works on newer or older versions.
Atlas Right Track v8.0 Installer
| Layouts on a 2x4' table | |
|---|---|
 |
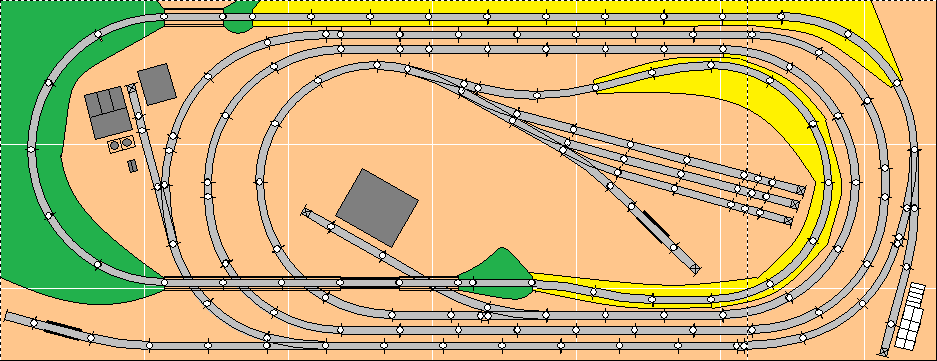
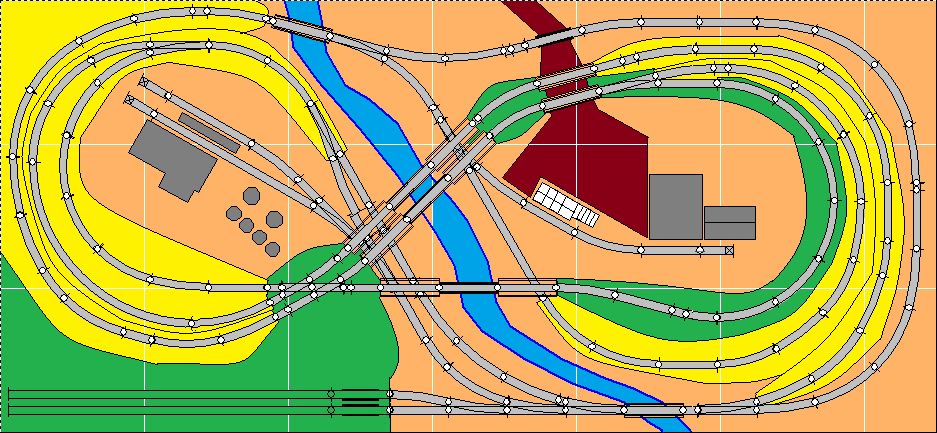
Plan Name: 2x40001. The best trackplan I ever came up with. You get continuous action, the visual appeal of two levels, a branch line with interchange, and three decent-sized industries, all in 2x4' - such a deal! The crossing in front gives the look of a major junction. I'm in the process of building this one; trains are running and some basic scenery is in place. |
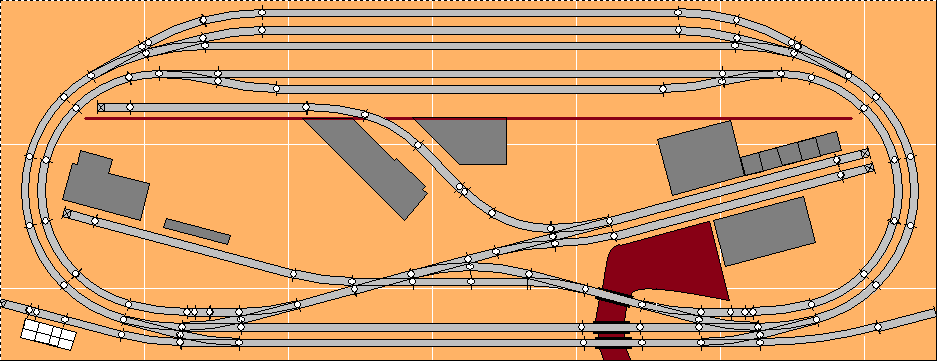
| Plan Name: 2x40002. An unabashed double-track spaghetti bowl, but at least this one leaves room for the buildings. This could make an interesting city scene, especially with a two-sided scenic backdrop separating the yard from the industries. | 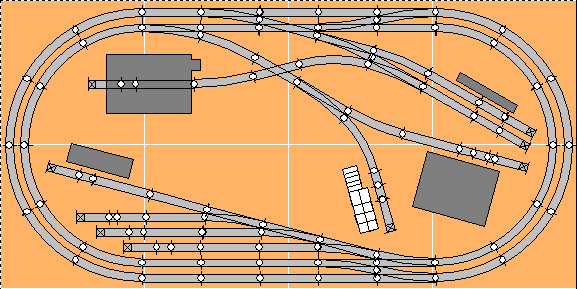 |
 |
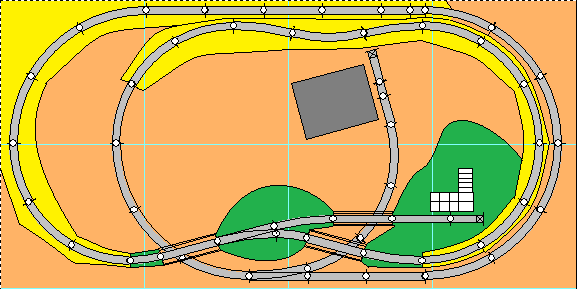
Plan Name: 2x40003. The turnouts at the top change a simple oval into a twice-around for a long mainline run. A small yard and two big industries will keep a train busy. |
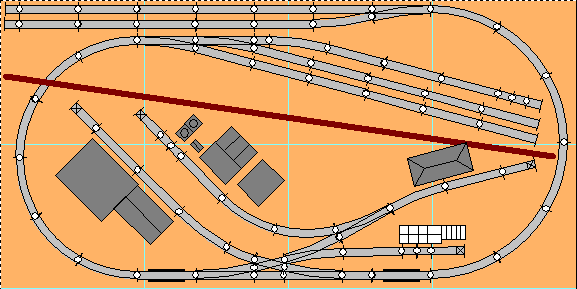
| Plan Name: 2x40004. This is the smallest out-and-back plan you're likely to find. It works by using the yard throat as part of the main line. The red track must be wired as a reversing section. | 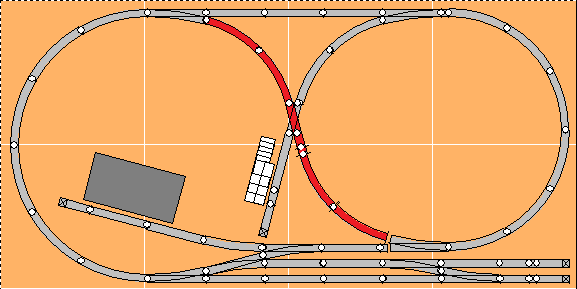 |
 |
Plan Name: 2x40005. A point-to-point layout representing a short line. Trains will leave the central yard, drop off and pick up cars at the interchange at the bottom, and switch the industries en route. This could easily be made as a two-level pike. |
| Plan Name: 2x40006. This layout offers a little of everything -- two main lines for continuous running, a small yard, and some industries. | 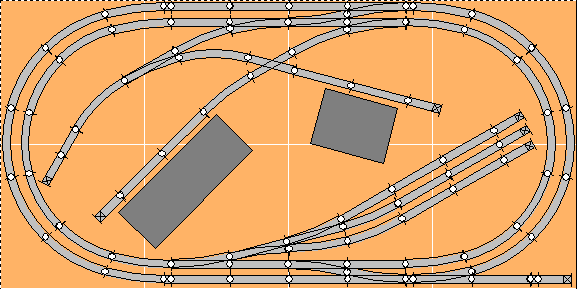 |
 |
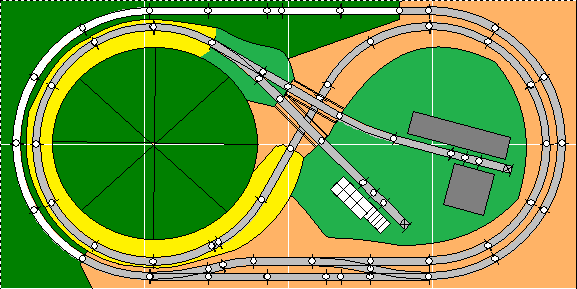
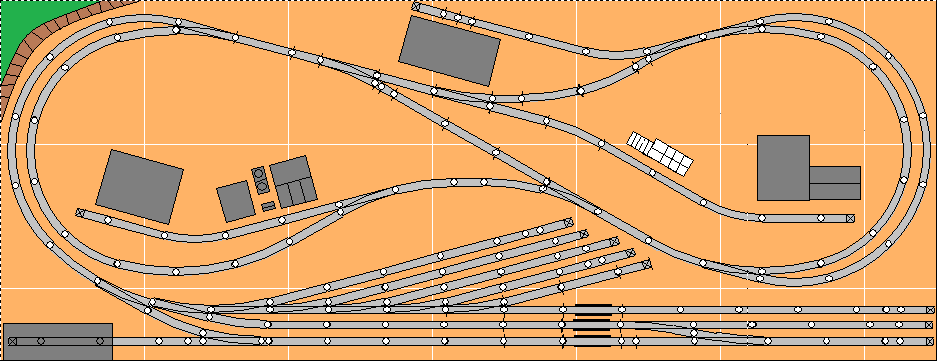
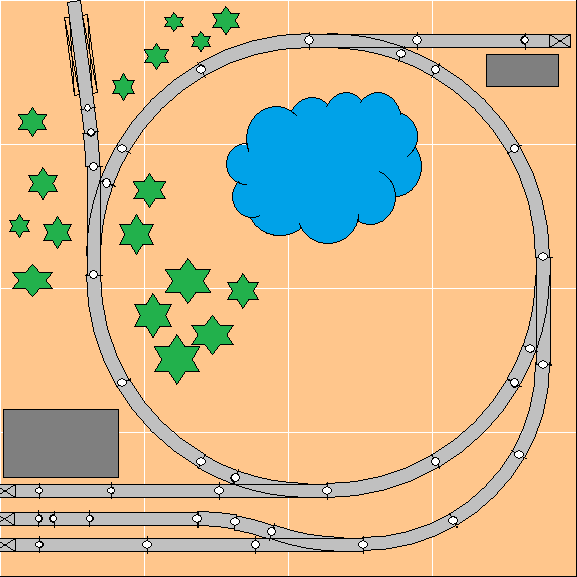
Plan Name: 2x40007. This up-and-over dogbone plan yields the longest mainline run you'll find in a table this size, if you can live with a really tight fit around the edges of the table. I've built it using a 49x25" table, and it was close. |
| Plan Name: 2x40008. You can run a rural shortline with this plan. It looks like there's no runaround track, but the center cutoff track can be used to run around cars so you can switch all the spurs. The spur on the left is the interchange track, which is vital to any shortline. | 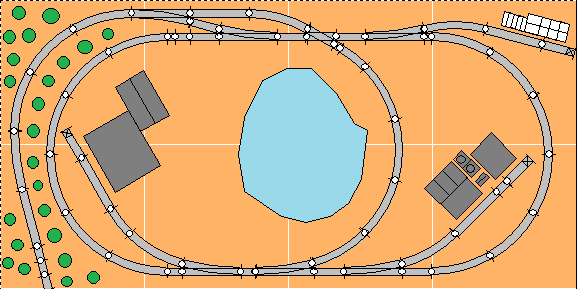 |
 |
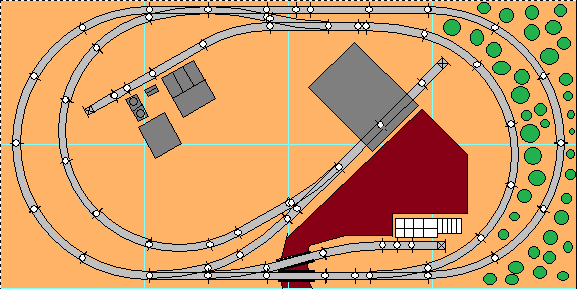
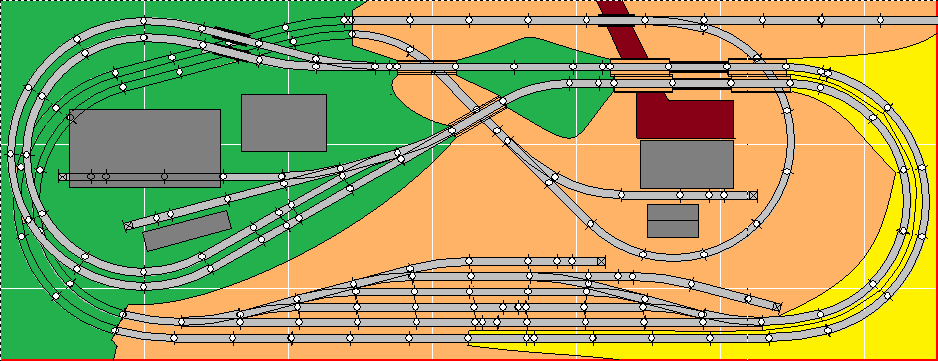
Plan Name: 2x40009. Care to model a shortline and its interchange with a mainline? On this layout, the mainline train comes out of its hidden track, swaps empties for loads at the interchange, and returns to staging. The shortline engine picks up the empties, takes them to the coal mine, and returns the empties to the interchange. The spartan engine facilities are also at the top of the mountain. Trains will have to be short - you can't have everything! |
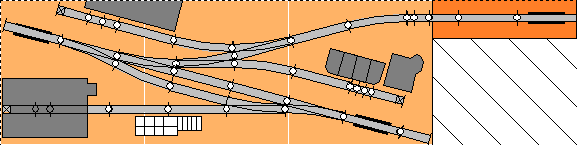
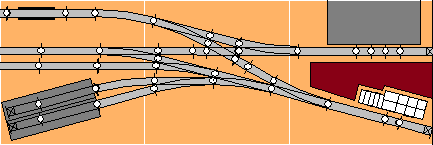
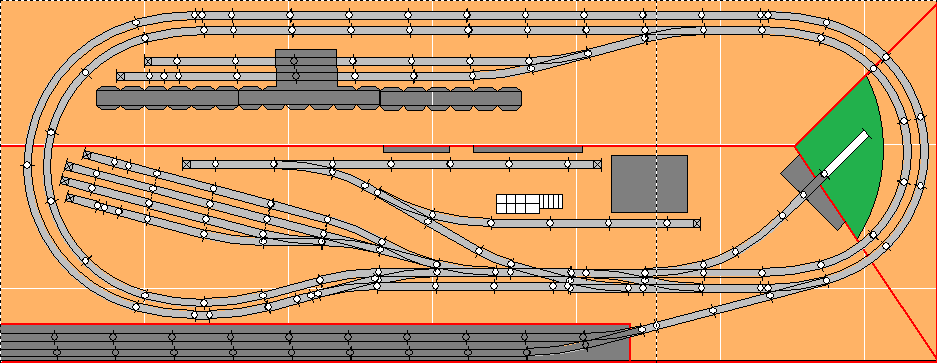
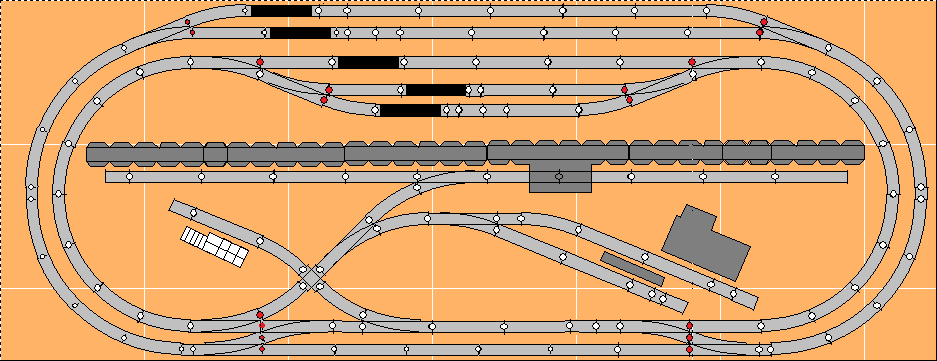
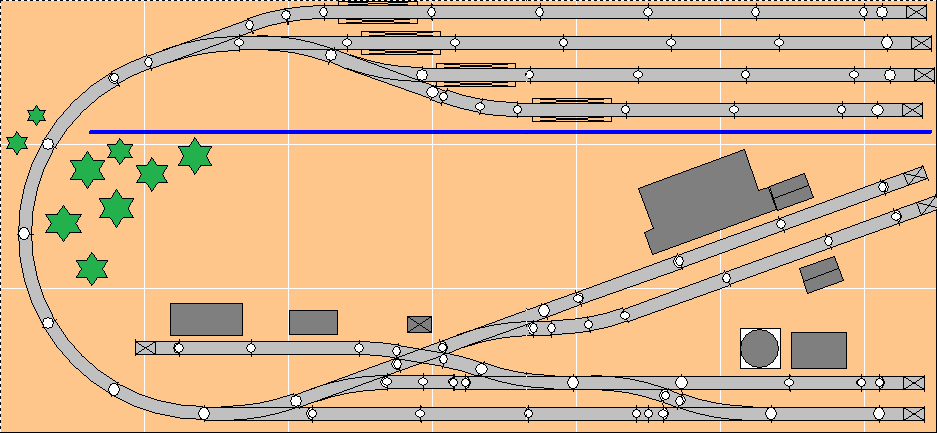
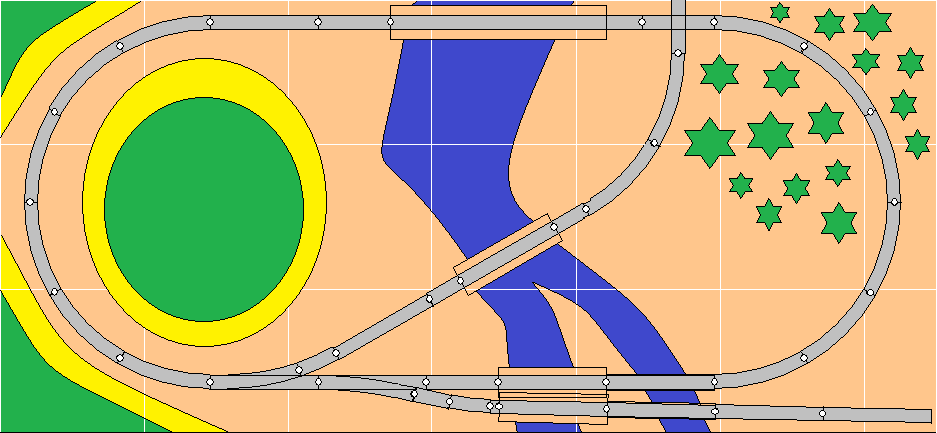
Plan Name: 2x40010. This busy layout represents a maintenance area that can handle any freight car:
|
 |
 |
Plan Name: 2x40011. A two-level point-to-point layout, great for a coal-mining or logging theme. Trains run down from the central yard to the interchange at the bottom, and back up again. |
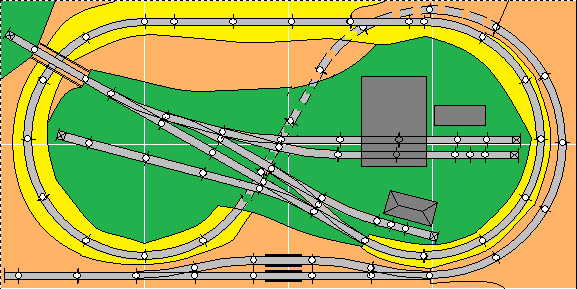
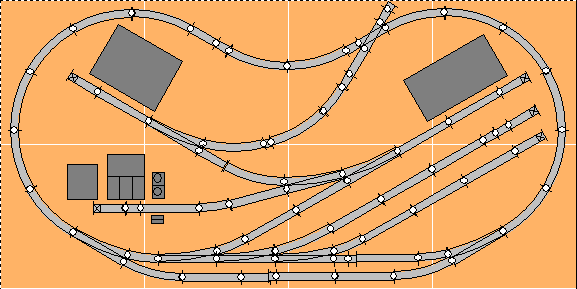
| Plan Name: 2x40012. For the railroader who can't get enough grade crossings, I offer this plan. There are six of them here, and only two are the same angle! The double main line allows two trains to run at once, and with all the industries, this layout would be a challenge to switch. | 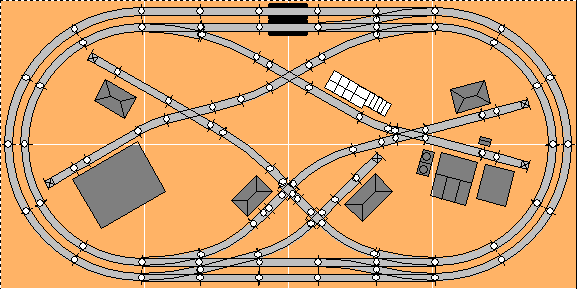 |
 |
Plan Name: 2x40013. On this layout, the inner branch line is actually longer than the main line. I'd elevate that branch about 1/2" for visual effect. Two good-sized industries and an interchange track will keep a train busy. |
| Plan Name: 2x40014. This busy city railroad could keep a switcher busy for hours. Here, the diverging routes from the interchange form a reversing loop, so with a little planning, you can switch the many spurs without any runaround moves. | 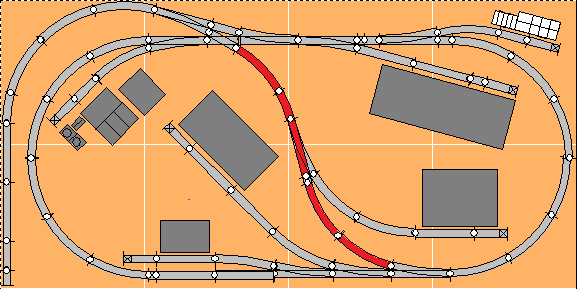 |
 |
Plan Name: 2x40015. This switching module is a condensation of Fox Lake, WI, a prototypical reverse loop. Industries include a lumber yard, a warehouse, an oil dealer, a large cannery, and a feed mill. (See the Feb 1976 Model Railroader for more info.) The loop's tail could connect to a bigger layout, a fiddle yard, or staging tracks. |
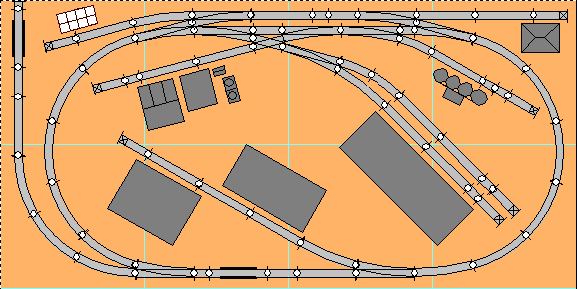
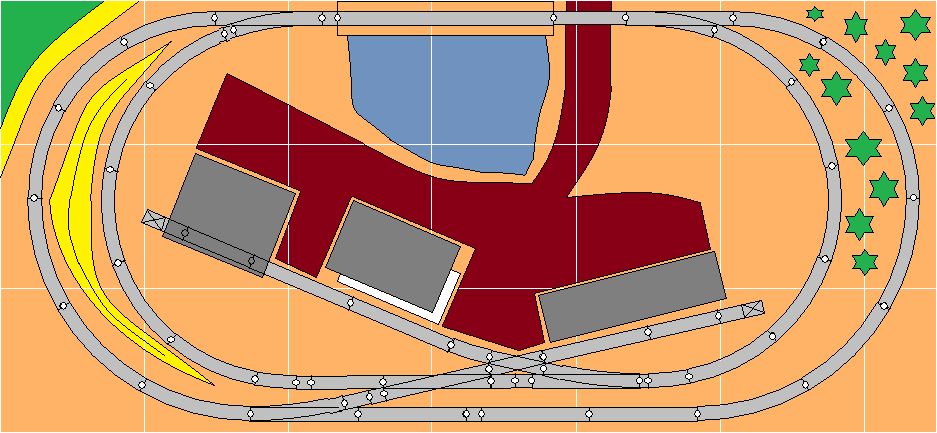
| Plan Name: 2x40016. If you want a big industry in a small space, here's an idea-starter. I used the Walthers paper-mill complex, plus a couple of smaller industries. The plan also includes an interchange track on the right, a hidden staging track at the top, and room for some scenery. | 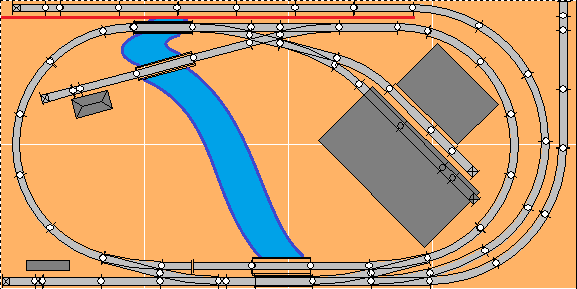 |
 |
Plan Name: 2x40017. On this plan, a scenic divider separates the yard and engine facility from the railroad's one big industry. The emphasis would be on switching the cars in the yard so they'll be in the right order when the road engine switches the industry. |
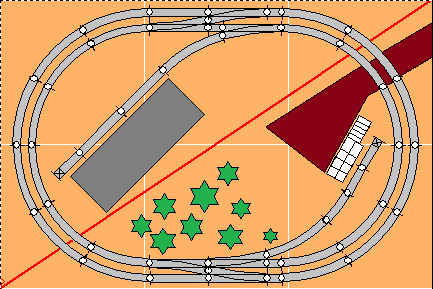
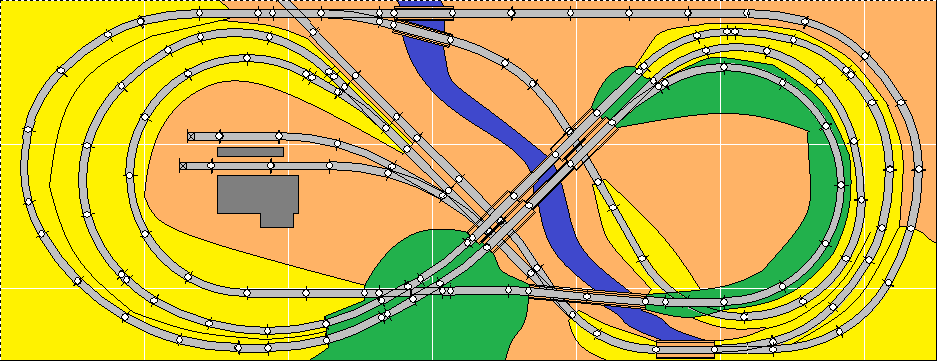
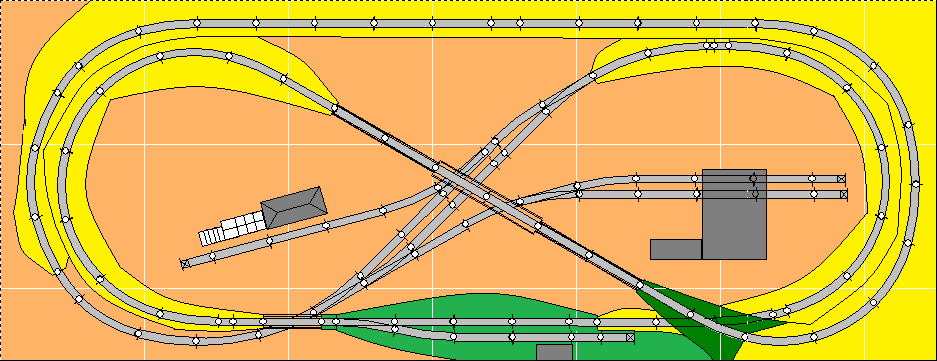
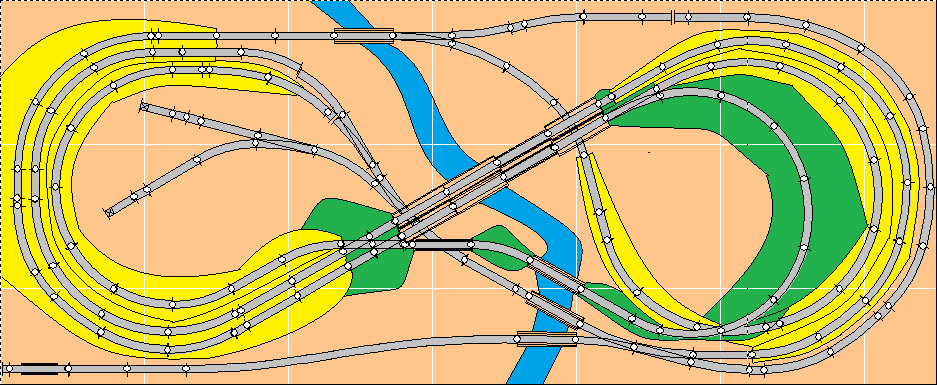
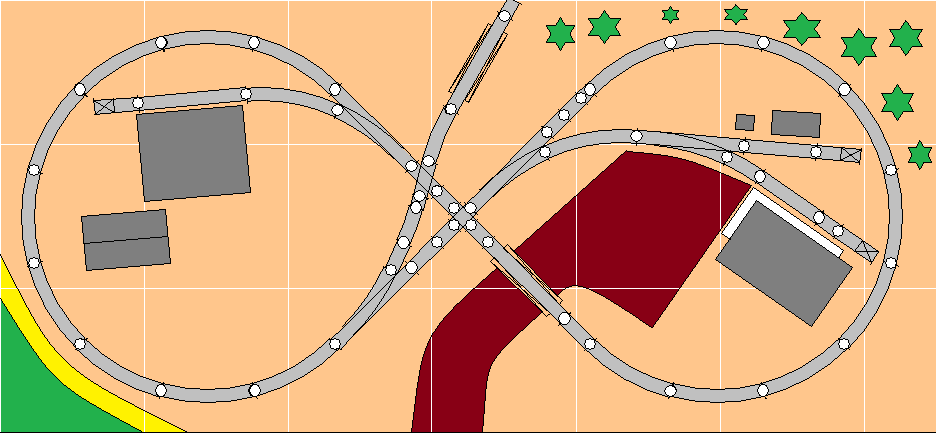
| Plan Name: 2x40018.Atlas likes the concept of an oval with a figure-eight inside; this is my take on that idea in 2x4'. Most of the curve radii are 9-3/4", and the runaround track at the bottom is barely long enough for one 40' car, so your equipment will have to be short. In exchange for that sacrifice, you get two mainline routes, the busy effect of twin crossings, and a spur that is almost long enough to be a branch line. | 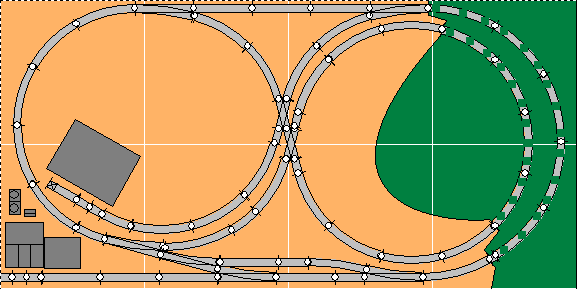 |
 |
Plan Name: 2x40019.This busy little plan features a small yard, three industries, an interchange track (the crossing track at the top), and multiple switchbacks. This is the kind of plan that a switching fiend might love. |
| Plan Name: 2x40020. A scenic divider breaks this double-track layout into two scenes. One is a surprizingly big yard with an engine house; the other serves some big industry made of DPM modules. The lone runaround track will make you plan your switching moves well in advance. |  |
 |
Plan Name: 2x40021. I doubt you'll ever see a true loads-in, empties-out plan in 2x4, but this one comes close. Loads go into the big industry (a coal-washing plant?) via the long curving spur, and out by the short spur; empties move the opposite direction. Two other industries add variety. |
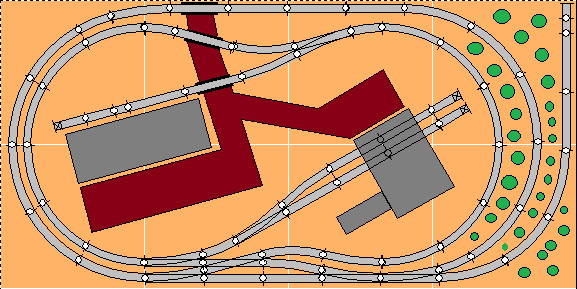
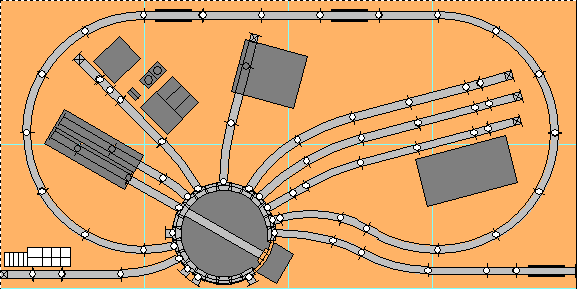
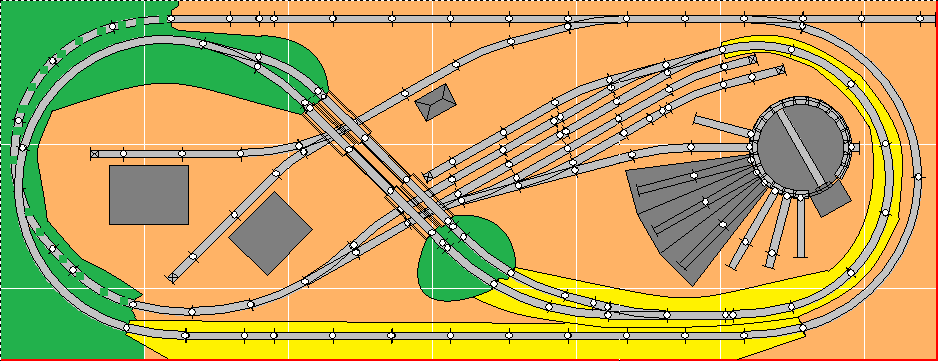
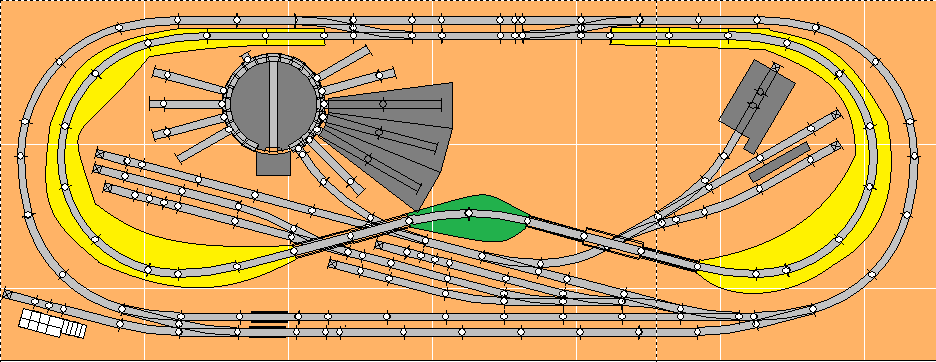
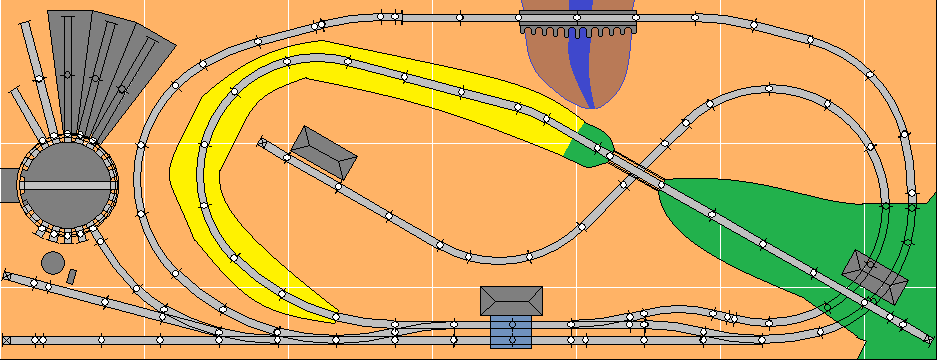
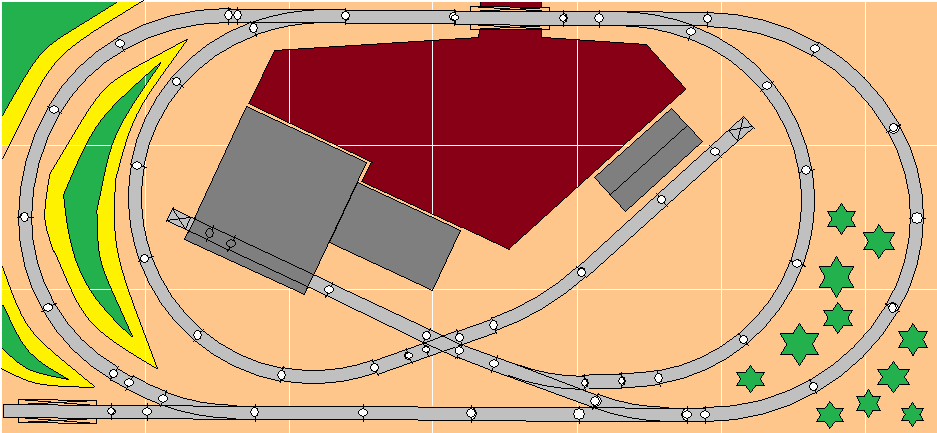
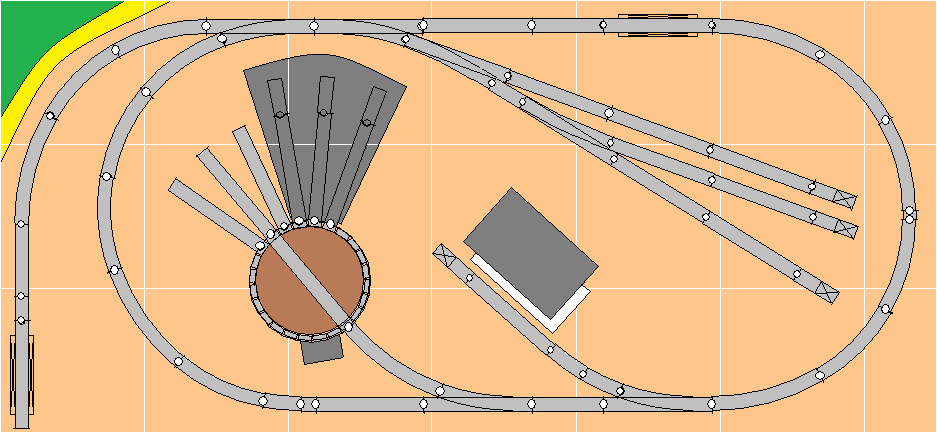
| Plan Name: 2x40022. Here's a special-purpose trackplan for the modeler who loves his/her engines. An Atlas turntable and roundhouse, and a Walthers backshop, are the main attractions here. There's an ash dump track at upper right, a diesel fuel rack at lower left, and coal, sand, and water for steamers at center bottom. | 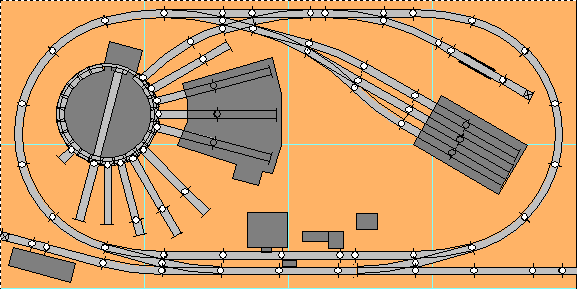 |
 |
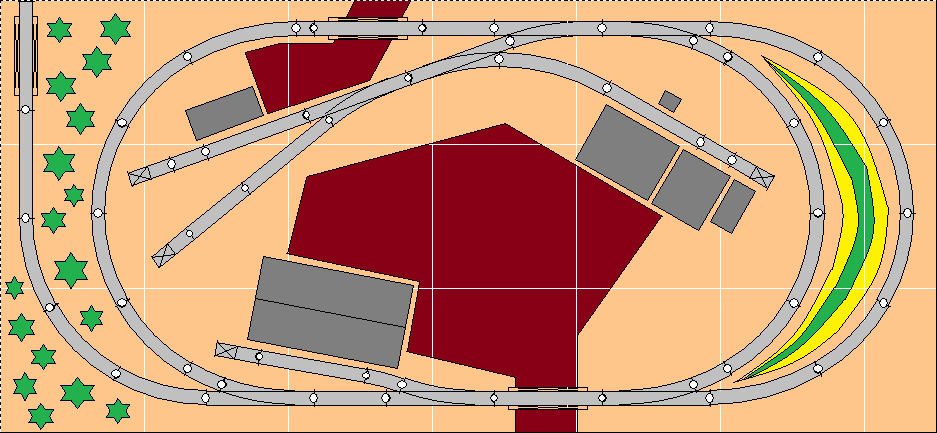
Plan Name: 2x40023. If you like your industries, this layout may be what you need. The long interchange track at left feeds seven assorted industries, with room for at least 12 cars. If it weren't for the closed oval, this could be considered a switching layout. |
| Plan Name: 2x40024. This simple plan is for the mountain-scenery lover who doesn't have much room. The bottom portion of the layout features a tall trestle crossing a valley. If you don't already know how you'd handle such a scene, this plan isn't for you. The top is nothing but three staging tracks, and probably wouldn't need any scenery at all. | 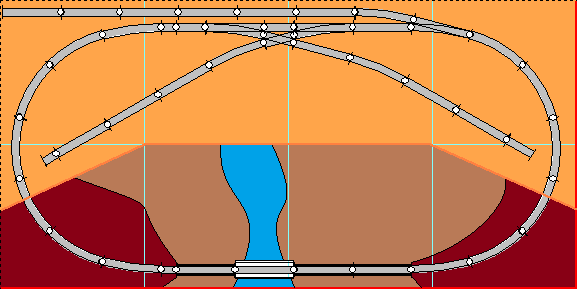 |
 |
Plan Name: 2x40025. Someone e-mailed me and asked for a 2x4' plan with a car float, so I drew up this one. The emphasis is on interchanging cars between the float (which could be removable) and the two diverging lines that head north and south. There are also two industries, a small engine shed and service area, and room for some harbor scenery. |
| Plan Name: 2x40026. This is a folded dogbone on one level. It gives a long mainline run. You can have some fun switching cars between the industry and the interchange track, and there's room for some impressive scenery. | 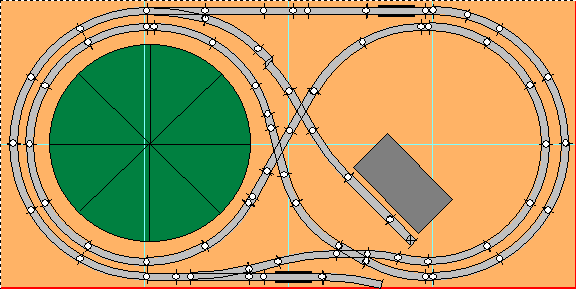 |
 |
Plan Name: 2x40027. Engines are expensive; track is cheap. If you have a switcher and a road engine and would like to gove them a work-out, check this plan out. The four-track yard gives you room to make and break trains on the arrival track outside the oval, while the interchange and three spurs give a freight train something to do. The engine house and engine pocket complete the scene. |
| Plan Name: 2x40028. Another two-level point-to-point design. This one has short runaround tracks at both stations and the interchange, so handling freight cars in any direction is doable. You could even use the runarounds as escape tracks for a switcher if a doodlebug or RDC made a run up the hill. | 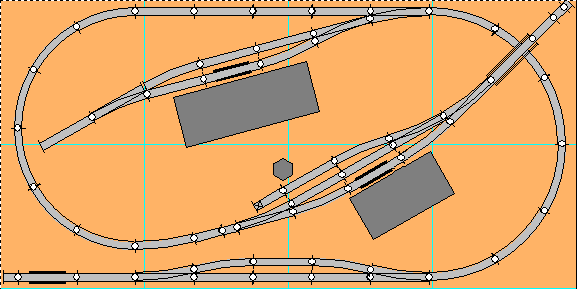 |
 |
Plan Name: 2x40029. Just for fun, a layout with no turnouts! And yet you get continuous operation, a small yard, four industries, and interchange. Everything runs through the Atlas turntable, which can hold a GP-7 and a 40' car, or a SW-1200 and a 50' car. |
| Plan Name: 2x40030. This is essentially a switching layout with provision for continuous running. The three industrial spurs are so interlaced with the reversing connection (which is also the only runaround) that it isn't always obvious which way the engine should go to make its deliveries. | 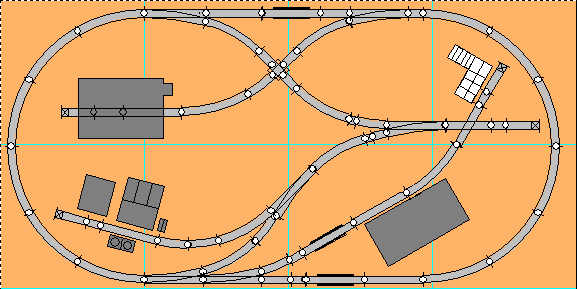 |
 |
Plan Name: 2x40031. Vertical twice-arounds eat up a lot of space; this is about the best I can do in 2x4'. A small industry on each level gives a freight train something to do, but this plan's focus is the scenery and the bridges. |
| Plan Name: 2x40032. This is another urban layout. A switcher can be full-time busy shuttling cars from the yard to the industries and back, while another train runs freely on the outside main line. | 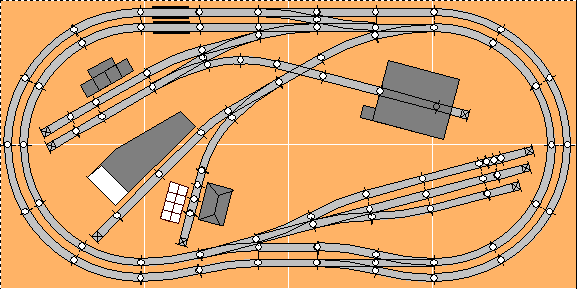 |
 |
Plan Name: 2x40033. This is a British-style layout, where trains enter the scene from staging, do some work, and then leave. This one has double-ended staging so trains can come and go from both directions. You can have four trains, or five if at least one train returns in the direction it came instead of continuing onward. |
| Plan Name: 2x40034. This is another British-style layout, with provision for five trains. One of them will have to be very short; an RDC or doodlebug will fit nicely on that one really short staging track. |  |
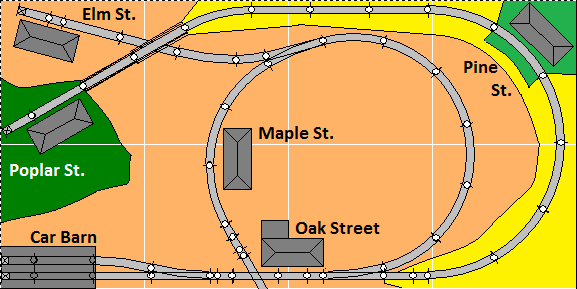 |
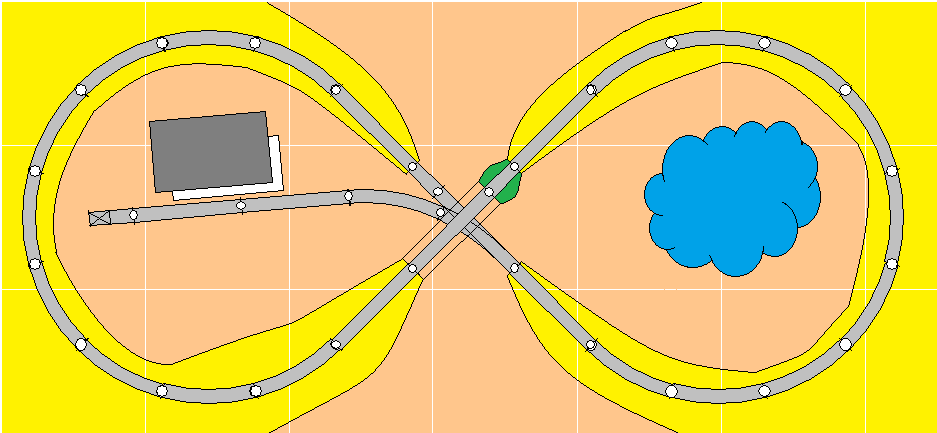
Plan Name: 2x40035. If you like trolleys and streetcars, this plan may suit you. In only 2x4 feet, you get two branching routes with five stations to visit, plus the car barn. Grades are 4%, which is no problem for a single streetcar. You could play this layout like a game for two operators, each with one streetcar: take turns drawing cards that represent each of the five stations, double the cards for Oak Street Station because it's the biggest, and the car barn. Then find the most efficient way for both of you to move to your new destinations. |
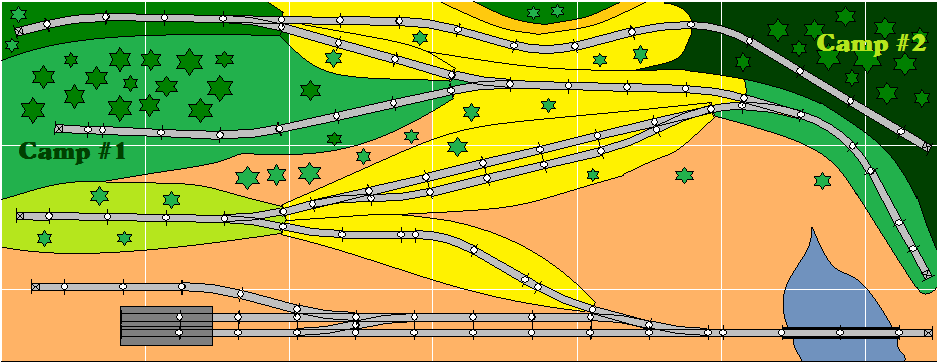
| Plan Name: 2x40036. Here's a logging layout if you want to find work for a Shay or similar geared locomotive, or better yet, two of them. There are two logging camps at the top of the hill, and the only runaround track is at the bottom, and it's only long enough for one freight car at a time. The trains to Camp #2 are straightforward switchback runs, but running to Camp 1 will require you to rearrange your train at the start and the end of your run. | 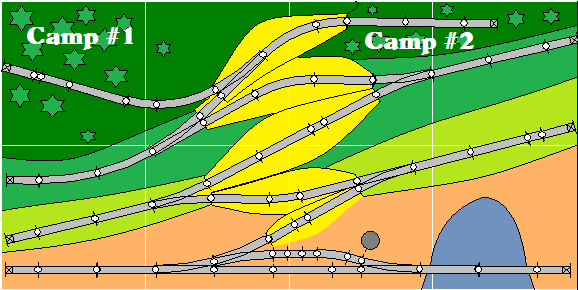 |
 |
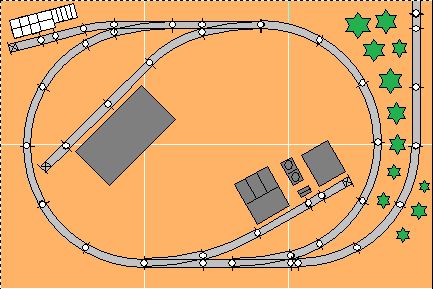
Plan Name: 2x40039. Here's a very simple plan that still allows realistic switching. It features one big industry, the bakery that gives us those delicious Dig Dogs, Ha Has, and Yellow Chemical Cakes. It has spots for two boxcars, one covered hopper under the structural bridge, and one tank car. Cars enter and exit the layout via the interchange at upper left. The track beyond the crossing at upper right should look weedgrown and abandoned, and the interlocking tower there should be boarded up. The bakery should look like it started small and received many additions as the years went by. |
| Plan Name: 2x40041. This is a simple switching layout with one medium-sized industry and two smaller industries. What sets this one apart from most other switching layouts is that it's a double-decker. The interchange is the elevated track at the top right corner. Your switcher picks up cars there, descends the 3.25% grade to ground level, and switches the industries there. There's room for some scenery here, beyond the usual urban area. | 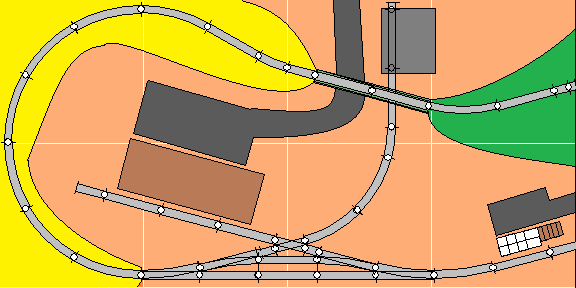 |
| Layouts smaller than 2x4' | |
|---|---|
 |
Plan Name: 2x3001. Two levels and three industries in a minimum size - 2x3'. Grades are around 4%. Even in this small space, one train can switch the upper level and the grain elevator while another takes laps on the main line, without interfering with each other. The track and bridge at upper right can double as an interchange. |
 |
Plan Name: 2x3002. This is a simple 2x3' layout that still allows some switching. Cars appear on the interchange track at right, and are spotted at one of the three industries. There's room for some scenery, too. |
 |
Plan Name: 2x3003. This is one end of a possible shelf layout or modular pike. It includes a small yard, industrial spur, engine house, and a passing track, all in 2x3'. The shelf to which you connect it can be as narrow as 6 inches. |
 |
Plan Name: 2x3004. If you like watching multiple trains roll, but 2x3' is all the space you have, here's your trackplan. The double-track mainline has crossovers if you want them, and two industries if you want to switch them. The scenic divider separates the urban scene from the country scene. |
 |
Plan Name: 2x3005. If you absolutely must operate realistically in 2x3', then this simple-looking plan may meet your needs. The upper-left interchange track connects to three industries on two spurs, and the freight station can serve as a fourth industry. |
 |
Plan Name: 2x30006. A busy 2x3' switching layout. Cars appear on the interchange track at upper left, and are spotted at one of the five industries. |
 |
Plan Name: 21x30_01. The smallest layout I can design with standard track sections and still include two industries. The table is only 30x21". Even in this tiny size, the spurs run at different angles to avoid unnatural symmetry. If you don't have room for this one... |
| . | |
 |
Plan Name: 1x3_01. Here's a really small switching plan, one foot wide and three feet long (plus a foot-long removable tail track to serve as the interchange). If you choose your structures wisely, you can fit four industries onto this tiny layout. I gained a few inches of length by setting the tracks at an angle to the benchwork. |
| . | |
 |
Plan Name: 1x3_02. This plan is definitely for switching-puzzle fans. Maybe it tries to do too much in just 3 square feet, but I had to try. The interchange at top left feeds three industries: a big car-repair facility at bottom left (the Walthers 2-Stall Enginehouse), a factory at top right (DPM Gripp's Luggage), and a team track with loading dock at bottom left. The problems are that (1) the runaround isn't visually obvious and requires multiple moves, and (2) both tail tracks on the right side double as industrial spots. You may need the lower of the two parallel tracks on the left to temporarily store cars from the factory and/or the team track in order to complete runaround moves. You'll be limited to switch engines and short (under 50') rolling stock. |
| . | |
 |
Plan Name: 4x06001. A minimum-size shelf switching layout, with seven industries in a space 4 feet long and only 6 inches wide. The siding with the rerailer is the interchange track. |
| . | |
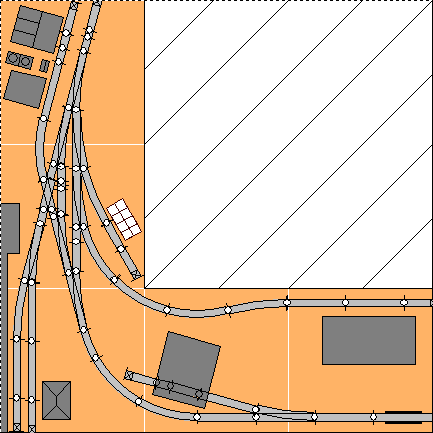 |
Plan Name: 3x3001. This switching layout is bent around a corner, so it only takes up 5 square feet. In that limited space, you still get 6 industries and interchange. The curved center gives your switch engine the chance to run a little. |
| . | |
 |
Plan Name: 30x30-01. I wanted to fit a switching plan with a runaround track into a 30" length, using standard Atlas track, and I found that I can do it... if I bend the layout around a corner. This plan gives a decent variety of freight cars -- covered hoppers to the cement plant at upper left, tank cars to the oil dealer at the bottom, boxcars to the factory at the right, and boxcars, gondolas, or flatcars to the loading dock just above the factory. A tank car at the oil dealer will complicate your switching because it blocks one of the roundaround's tail tracks, so some tricky switching might be required. The rerailer track at bottom left is the interchange. |
| . | |
 | |
| Plan Name: 10x60_01. If you can spare 5 feet in length, you could build this linear spaghetti-bender. A busy chemical works takes up the left side, while the center and right hold five more industries and the interchange track. | |
| . | |
 | |
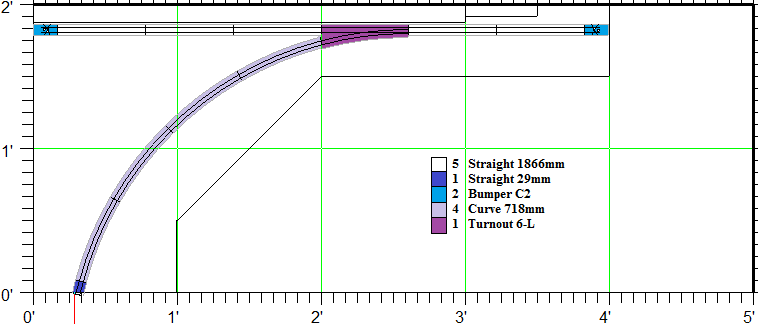
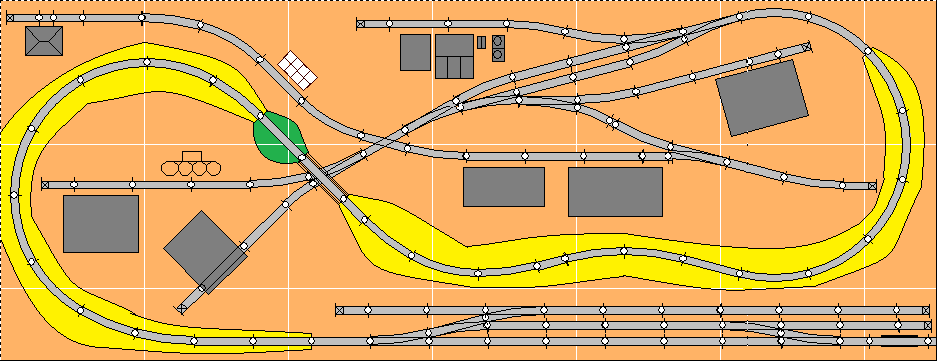
| Plan Name: 10x60_02. This plan is 5' long and 10" wide, with five industries for a good variety in car types: from left to right, a feed & seed dealer (boxcars), Walthers bulk oil dealer (tank cars), a loading dock (boxcars, gondolas, or flatcars), DMP Gripp's Luggage factory (boxcars, or reefers if you make it a food processing plant of some kind), and Walthers Medusa Cement (covered hoppers). The track at top left is the interchange and the connection to the rest of the world. The curving track to the right of center is a mostly-abandoned branch that gives you room to temporarily spot a car if things get too crowded. The neat thing about this plan is that it splits in two at the green line into two 10x30" sections, and 10x30 are the dimensions of an Ikea "Billy" bookcase shelf. You could build this layout, display it as two dioramas on two levels in the bookcase, and then remove the shelves, connect the tracks, and run a railroad. | |
| . | |
 | |
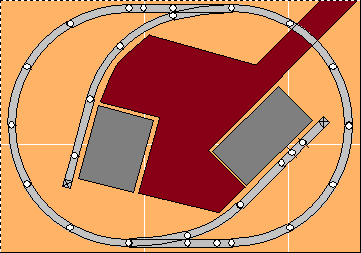
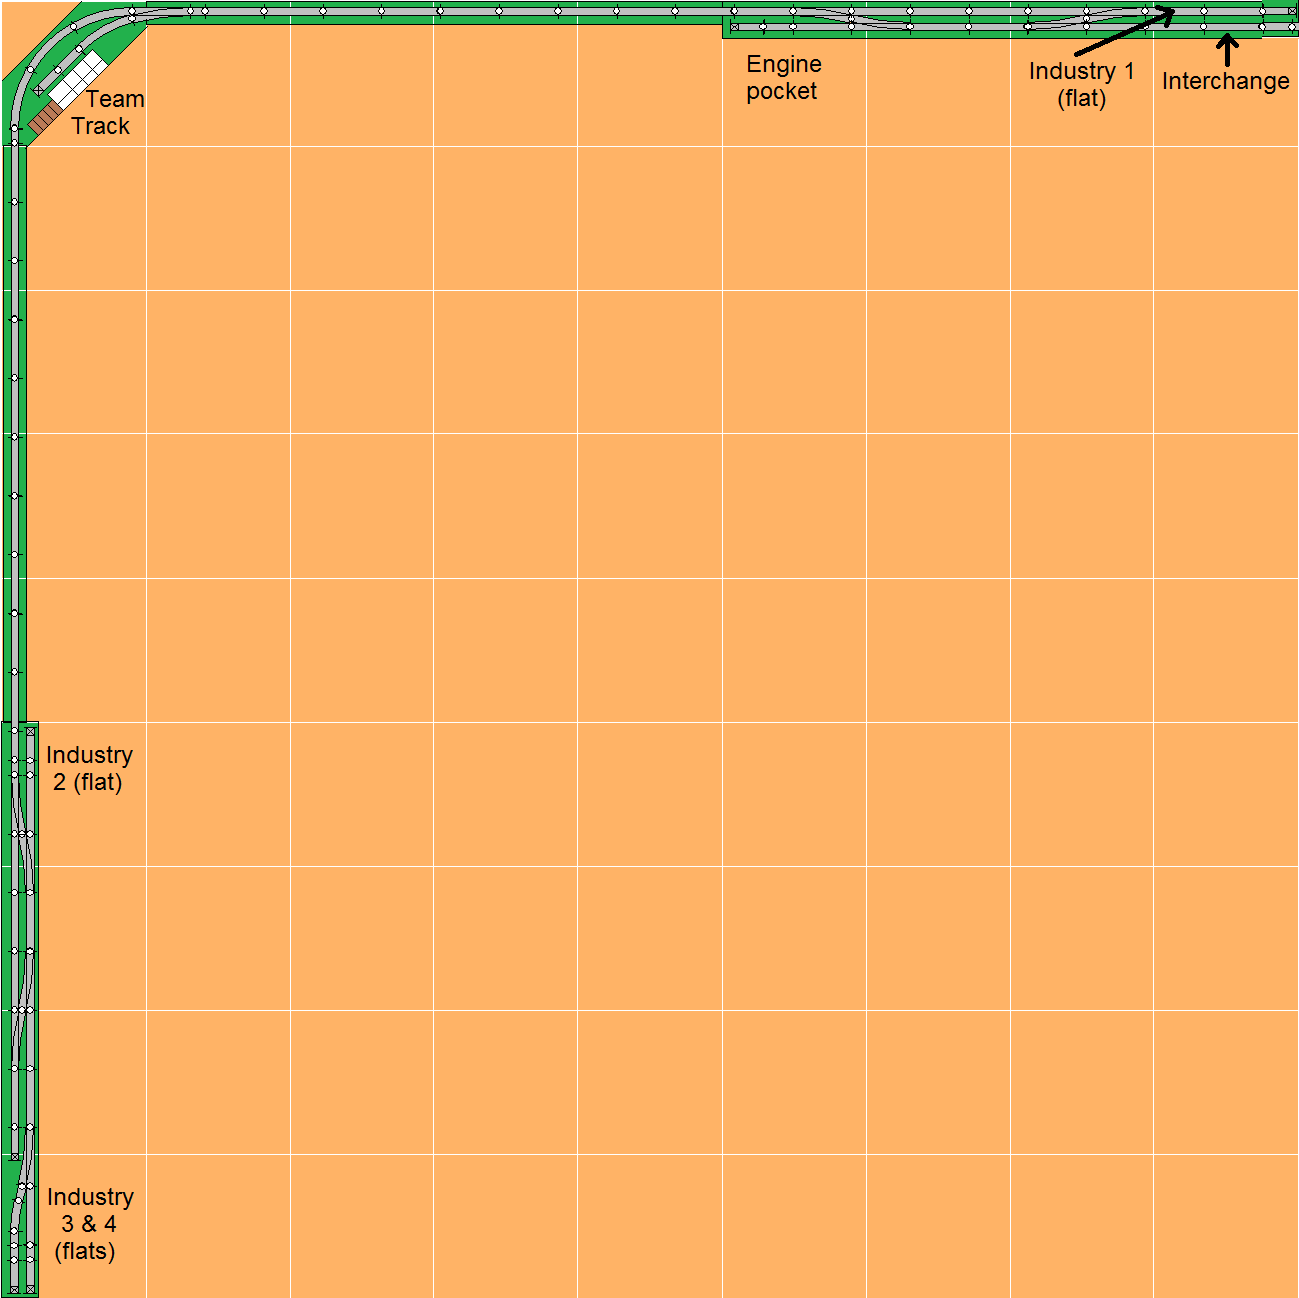
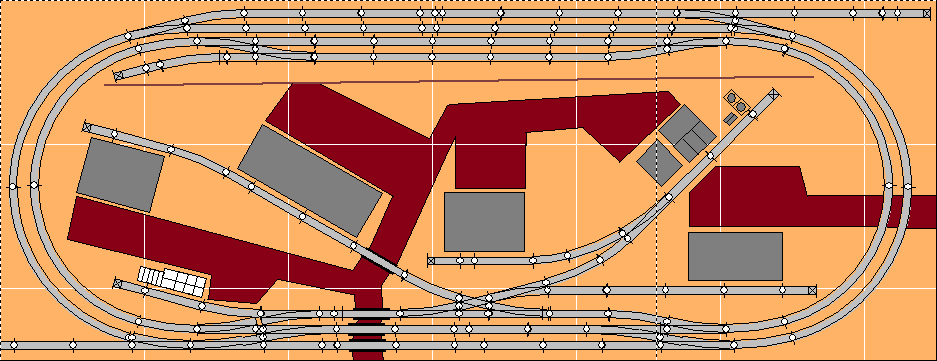
| Plan Name: 12x7201. This 1x6' switching plan serves one huge customer, Acme Industries - "Proudly Serving Wile E. Coyote since 1949!" Clearly, an industry like this (which could be made with DPM wall sections) has to handle a wild variety of freight traffic.
The angled track at top left is for covered hoppers; the track just below it has two spots for boxcars; the track below that is a switchback track with a loading dock for overflow spotting, and could also have a simple engine fuel facility. The short spur in middle center is for reefers and boxcars; the long spur at the bottom has a gantry crane for flatcars and gons, and a tank-car pumping station and storage tanks at the end. And the long track that runs into the factory at the top? That one can take any type of car, from ore jennies to flatcars with missile launchers. The spur on the right that ends with a rerailer is the interchange. |
|
| . | |
 |
|
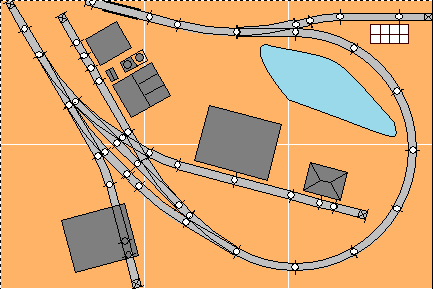
| Plan Name: 4x72_01. I was in a weird mood, and I wondered if a worthwhile layout could be built on a six-foot-long 2x4 board, so I came up with this one. The track at left with the rerailer is the interchange, where cars come on and off the layout. The gray bars are building flats; the one at left has 2-3 locations for cars to be spotted. The white grid in the middle is a loading dock for flatcars and gondolas. The half-circles are a location for tank cars. The L-shaped building at right is a big customer; boxcars get set out on the lower track, while the upper track leads into the building. The fun begins when you realize that some tracks serve two purposes; the track in the building doubles as the switchback for the tank-car location, and the loading dock is on part of the only runaround track. Switching this industrial district could keep you busy for hours. | |
| . | |
 | |
| Plan Name: Modular3. Here's a two-piece sectional layout; it isn't really smaller than 2x4', but each of the pieces is only 2' 1" x3', so I filed it here. This layout offers a double-track mainline, up-and-over action, and room for both some switching and some scenery. | |
| . | |
 |
Plan Name: InglePizza. This corner plan isn't small in terms of its length and width, but it takes up only 7 square feet. It combines an Inglenook Sidings switching puzzle (the lower arm) with a "pizza" layout (in the middle), along with another arm set up for switching at upper right. I call it the InglePizza. The 'Nook can double as a yard from which a switch engine can draw cars to deliver to the upper arm, and to the warehouse next to the 'Nook. |
| . | |
 |
Plan Name: 1switch. I made a trackplan that was true to two limiting concepts: the one-turnout layout and the "true" micro-layout (with a footprint of four square feet or less). The plan uses N scale Unitrack, and although it's quite simple, it has some hidden virtues.
The warehouse served by this railroad is BIG. The visible portion is only 1-1/2" deep, but whether it's a brick building made of DPM modules, or a modern steel "Butler building," it looks long enough to deserve rail service without selective compression. As drawn, it can accept four 60' (as shown) or 50' boxcars or reefers. The tail track has room for two cars and an engine, and yes, it's possible to switch specific cars to specific warehouse doors, no matter how they're blocked in the train. Sorting your cars into correct order is what makes this layout more than just a display in a corner. If you prefer an era that uses forty-foot freight cars, there's room for five of them at this warehouse. (Imagine a string of five colorful billboard reefers spotted there.) The tail track will hold three cars and an engine, and it's still possible to switch them to specific locations, no matter how they're blocked. As an additional possibility, how many micro-layouts can handle those huge 86' boxcars? This one can! The warehouse can support up to three of them. They don't pose a switching challenge, though -- the tail track is too short for sorting them, so they'll have to be blocked in correct order. If you can extend the tail track by 5", then even those ultra-long brutes can be sorted and switched. The one turnout is a #6, and the approach track is a super-broad 28.25" radius, so even those 86' boxcars will look good. You can add a staging cassette at the bottom if you wish, or you can use the curve as a fiddle yard. There's even room for some scenery around the curve, which can also serve as a posing bench to take good-looking photos of your trains, so this little layout can do double duty. |
| . | |
 |
Plan Name: 4SqFt. Just for fun, this might be the biggest micro-layout ever! It stretches along both walls of a 9x9' room, yet its actual footprint is a bit less than four square feet. This is because the "main line" shelves are only 2" wide, and the end sections are 3" wide. Scenery will be rudimentary and the buildings can't be more than flats, but if you want to see your train run a fair distance between switching locations without taking up much space, this plan might work for you. |
| . | |
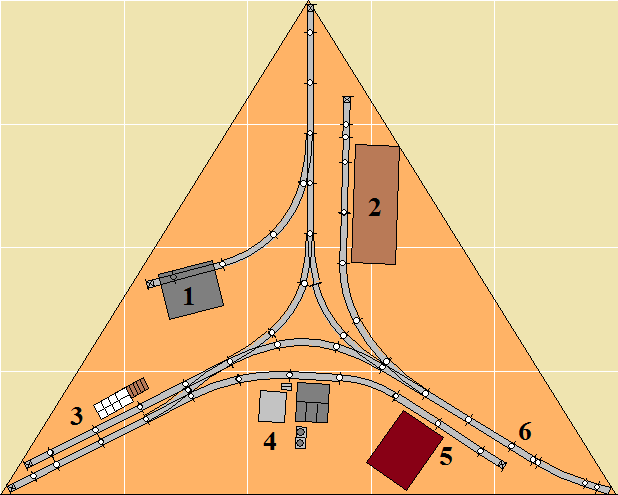 |
Plan Name: Triangle00. This is my most popular trackplan on Facebook's Micro-Layouts group. It's an unusual shape, an equilateral triangle. Each side is visually and operationally different from the others. The wye in the middle is the only runaround track. This would make an eye-catching demo layout, and it's a perfectly good switching layout for your home as well.
|
| . | |
| Layouts on a 78x30" door | |
|---|---|
 |
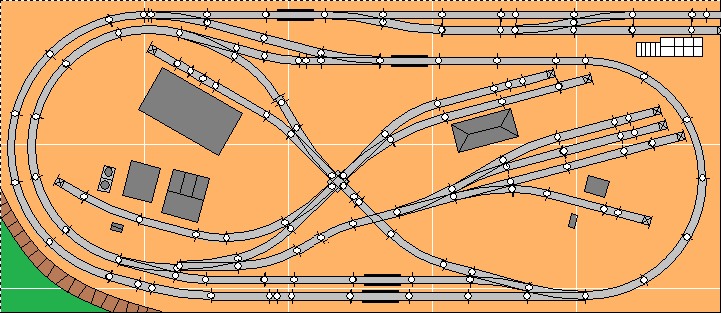
Plan Name: 78x30001. This one is for the modeler who likes to watch 'em roll, with an occasional break for yard switching. The mainline curves are 11-3/4" and 13". Two hidden staging tracks improve operating variety, and the yard will hold roughly 24 cars. |
| . | |
 |
Plan Name: 78x30002. For those who like to watch a train run, here's a three-lap "pretzel" plan. It includes two small industries and a tiny yard. |
| . | |
 |
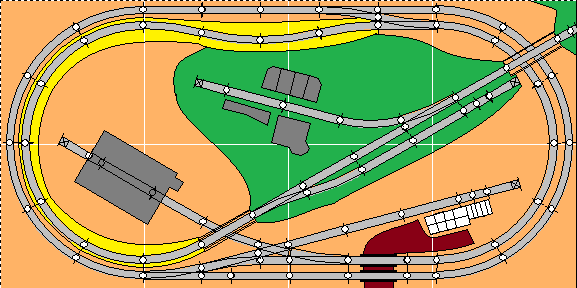
Plan Name: 78x30004. This plan uses scenic dividers to make three separate scenes - prairie on top, city on the bottom (with staging hidden in a mill building at the very bottom), and a mountain pass on the right end. |
| . | |
 |
Plan Name: 78x30005. This is the same plan as above, but with an industrial park instead of the yard and roundhouse. Six industries will keep a way-freight busy. |
| . | |
 |
Plan Name: 78x30006. Here is an up-and-over folded dogbone. The yard is small, but so are the passing sidings, so short trains will look good on the long mainline. The double bridges will look good, too. 11" minimum radius. |
| . | |
 |
Plan Name: 78x30007. Here's another folded dogbone, arranged differently. The yard is at middle-height, and the approaches to each end drop or rise to gain the required clearance. The big industry at left is the railroad's reason for being. The interchange track at upper-right could easily connect to staging tracks. There are no reversing connections, though they could be easily added. |
| . | |
 |
Plan Name: 78x30008. This plan is for the lover of rural railroading. The two industries are a chemical works and a grain elevator. The inner curve radius is 11", and the outer is 12-1/2", so modern diesels or big steam engines should run well here. With staging for four trains, you can have plenty of those engines ready to roll at any time. |
| . | |
 |
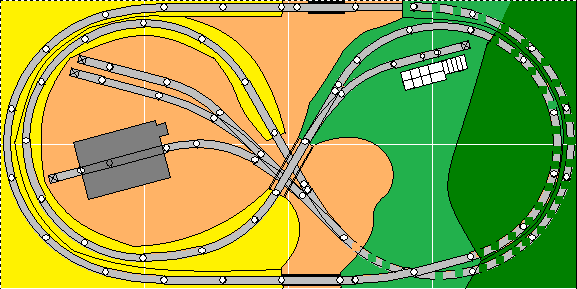
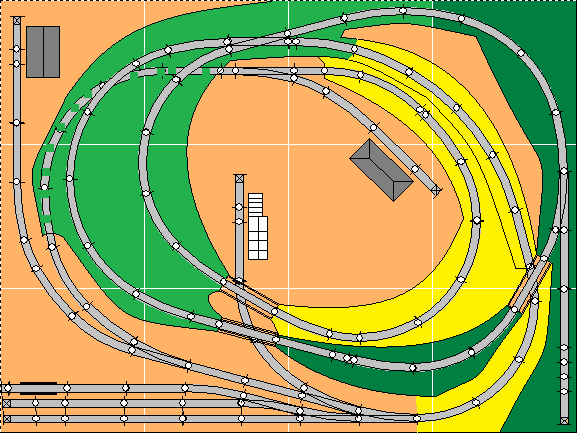
Plan Name: 78x30009. An outside oval with a 13" radius, plus a two-level twice-around inside it, let you run two trains at once without too much monotony. The little town has switching possibilities, too. The spurs in the right-hand corners lead to staging. |
| . | |
 |
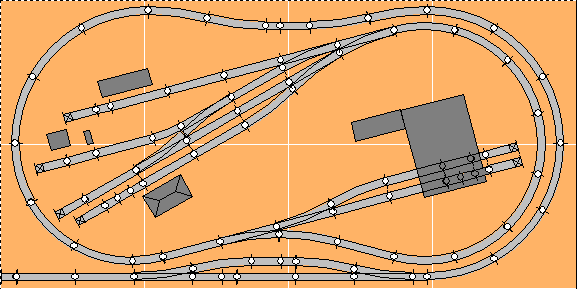
Plan Name: 78x30010. This is a fairly traditional-style plan. You can make & break trains in the yard, using the inner of the two tracks in front as an arrival/departure track. Two trains can run at once, one on the outer loop and one on the inner, up-and-over loop. A few industries are also provided. |
| . | |
 |
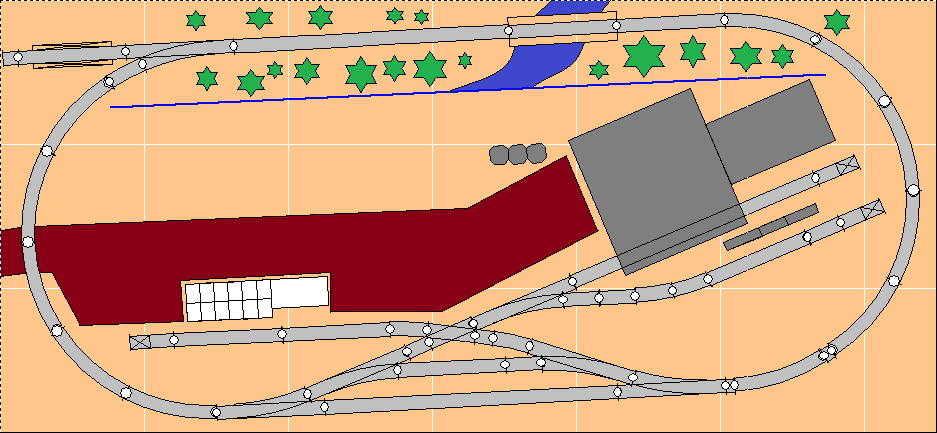
Plan Name: 78x30012. If you've acquired one or two of those amazing little N-scale Shay locomotives, or other logging engines, here's their new home. Short trains of disconnected or skeleton log cars ride from one of two logging camps at high elevation, downhill through a series of switchbacks to the bottom level, where they are pushed onto a bridge and the logs dumped into the water, which will carry them downstream to the sawmill. The passing siding in the middle is so an upbound and downbound train can pass; the one at the bottom is so the engine can get on the right end of its train, depending on which camp it's bound for, and then get on the right end for the push at the end. Also at the bottom is an engine house and a spur for some of those rickety-looking locally-built MOW cars. There's plenty of room for dramatic-looking scenery, too. |
| . | |
 |
Plan Name: 78x30014. New 12/19/2012 If you want a long mainline run, I can't do much better than this. At the expense of some scenic realism, I pack in four complete laps before a train has to retrace its steps. I also give you a small yard, three industries, and an interchange track. A busy, track-filled layout like this would probably look best as an urban scene. |
| . | |
 |
Plan Name: 78x30015. This is a special-purpose plan, intended for one specific kind of train: the N-scale models of Thomas the Tank Engine. There is a continuous mainline (11" radius) where the big engines like Gordon and Henry can run, and two long, winding branch lines where Thomas, Percy, and the other small engines can be really useful. Many of the familiar scenes from the series are reproduced here in compressed form, like Henry's tunnel (bottom right), the long viaduct across the valley (top center), the Knapford station (bottom center), and -- most important of all -- the roundhouse, where the engines can relax and chat after a long, busy day. The two spurs at bottom left are for the water tank (top) and spare coaches (bottom). |
| . | |
 |
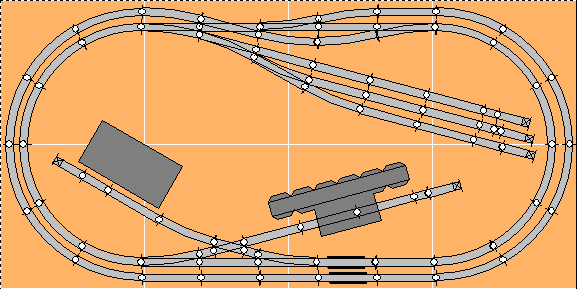
Plan Name: 78x30016. This variation on my double-track oval plans uses tighter curves (9-3/4" and 11"). In exchange for this, you get one more staging track, a passing/runaround track up front, more industries, and a "behind-the-scenes industrial park" that can take any kind of freight car. |
| . | |
 |
Plan Name: 78x30019. New 12/19/2012 This is an attempt to fit John Armstrong's Granite Gorge & Northern onto a 30"-wide door. It requires some heavy compromises, like 4% grades and the elimination of all passing tracks. The two-section bridge at lower center, and the track near it, has to rise above the rest of the second level in order to clear the graded track beneath it. But if your space is limited and you want to run two trains through mountain scenery, this could punch your ticket. |
| . | |
 |
Plan Name: 78x30020. New 12/19/2012 This is a rather simple layout for someone who wants the effect of a two-level pike without a huge investment in turnouts. The three-track yard at upper right is really a one-track yard with an interchange and a small industrial spur, and there is one more spur at ground level and two at the raised level. The minimum radius is 11", so you can run big modern diesels on it. This could also be an effective demo pike for shows. |
| . | |
 |
Plan Name: 78x30021. This plan is for the railroader with lots of coal hoppers who wants to see them roll. There's not a lot of room for operation, although I provided a coal mine, a truck-dump tipple, and an undefined industry. The emphasis is on the mountain scenery - the grades, the tunnels, and the long bridge or viaduct crossing the valley. |
| . | |
 |
Plan Name: 78x30022. Here's my first try at a door-sized switching layout. Trains run from the interchange and yard at the bottom, along a winding branch connection to the industrial park on the far end. Eight industries in a wild configuration of tracks will keep your switcher busy. |
| . | |
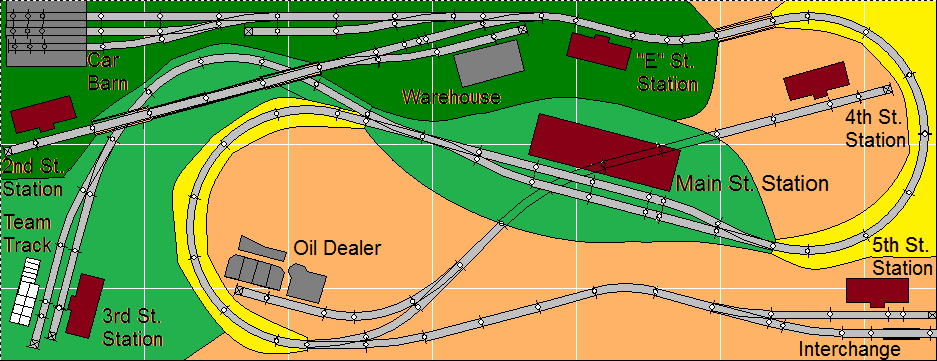 |
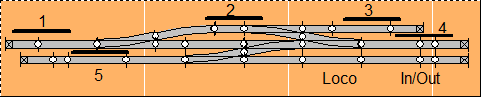
Plan Name: 78x30027. If you've ever wondered if those neat-looking N-scale streetcars could be useful on a layout, here's your answer. This urban plan is all about commuter service. Cars start at Main Street Station, then go uphill to "E" Street, 2nd Street, or the car barn (for clean-out or repairs), run level to 3rd Street, or go downhill to 4th and 5th Street. Grades can be steep because trains will be very short. Adding to the fun is limited freight service; a small engine must pick up cars at the interchange and deliver them to the three industries, using the runaround at Main Street if needed, without getting in the way of the streetcars. There is also a short spur near the car barn, so a car coming from the barn can pass a car headed in. Working out a passenger schedule, and then keeping it running, could be quite a challenge. |
| . | |
 |
Plan Name: 78x30028. This is a demo layout whose sole purpose is to let three trains roll, without any pretense at realistic operation. An outer oval with an 11" minimum radius encircles another oval with two spurs and a figure-eight. It might also be useful for a railroading family with three children who don't want to take turns running their train. |
| . | |
 |
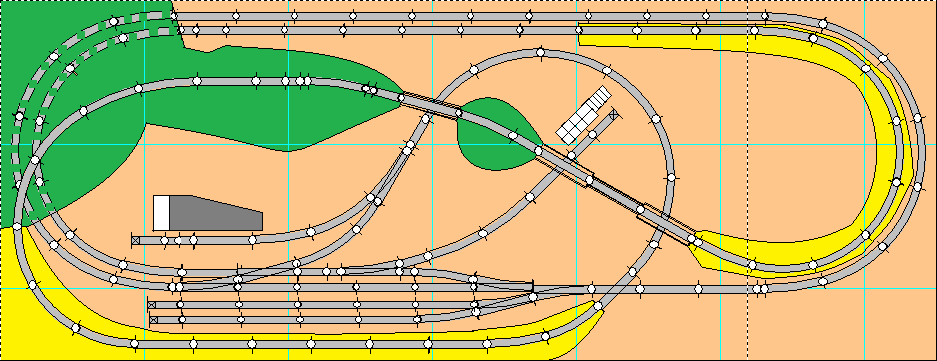
Plan Name: 78x30_26e. This is the plan I'm building. It consists of two levels that are not connected by grades, which leaves more room for industries (lower level) and staging (both levels). The top level is basically a display loop, but you can do some operating on the bottom. A small trapezoidal addition to the table supports the upper-level curve in front. |
| . | |
 |
Plan Name: 78x30-Code65-01. I've made exactly one trackplan for Atlas code-65 True-Track, and this is it. It's an obvious variation on a favorite theme of mine, the double oval with rural industries and staging. |
| . | |
 |
Plan Name: 78x32-ggn. New 12/19/2012 This is another version of John Armstrong's Granite Gorge & Northern, this time using a 32"-wide door. The extra width allows you to reduce the grades to 3%, and it also adds an interchange track at the bottom. |
| . | |
 |
Plan Name: 78x36-ggn. Now this is the best plan I've ever come up with. It's a third variation on John Armstrong's Granite Gorge & Northern, preserving all of the original's benefits on a 3'-wide door. A few industries and two single-ended staging tracks are provided for operating interest, but this is mostly a plan for the train-watcher. |
| My variations on other people's plans |
|---|
 |
| Plan Name: ggn1. Another take on one of the neatest plans I've ever seen, John Armstrong's Granite Gorge & Northern. This one is 4' x 6-1/2', and the extra space let me raise the minimum radius from 9-3/4" to 11" and reduce the worst grade from 3.5% to 3%, among other improvements. If you have room for a full 4x8, the staging track at lower right can wrap around the right end and branch into a hidden staging yard. There's no need to try and figure out how to scale down the original cookie-cutter carpentry; Woodland Scenics' risers and 3% inclines will do the job just fine. The original plan needs 5x9 in HO and is from Seven Step-by-Step HO Railroads (originally Six HO Railroads You Can Build), by Atlas Tool Co. |
| . |
 |
| Plan Name: n11. A few useful modifications to Atlas' plan N11, the Unhinged & Horizontal. By rearranging the yard throat, I can fit five freight-yard tracks in place of three. I also added an engine house and a third industrial spur, without crowding things too badly. The original is from Nine N Scale Railroads, by Atlas Tool Co. |
| . |
 Plan Name: Timesaver. John Allen's famous Timesaver switching-puzzle layout, using Atlas code-80 N scale sectional track
 |
| . |
 Plan Name: 2x50001. An N-scale variation on John Armstrong's Pennsylvania & Potomac, originally a 4x8 HO pike. (From 101 Track Plans by Kalmbach) This one needs 2' 3" x 5' and can be run as a continuous loop, an out-and-back, or a point-to-point. The crossing track that runs from upper-left to lower-right is a reversing section. Plan used by permission, courtesy of Kalmbach Publishing Co.
 |
| . |
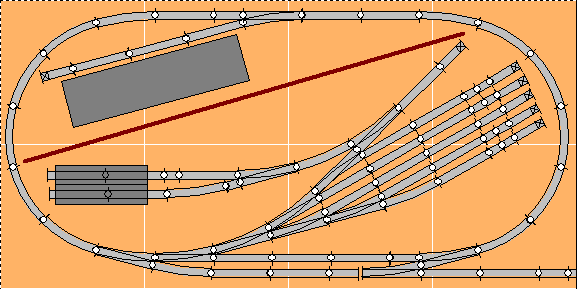
 Plan Name: LakeDist. The Lake District Ry, from 101 Track Plans. Three times around on a 3x4' table, with rather steep grades. This would be a pike to make scenery and watch trains run, although there are a few spots for switching. There is no runaround track, but all spurs except the top one are trailing-point for a train running counter-clockwise.
Plan used by permission, courtesy of Kalmbach Publishing Co. |
| HO Scale Tiny Layouts | |
|---|---|
| I had a brief flirtation with HO scale a few years ago, but it didn't last, mostly because we moved to a much smaller house where even a tiny HO layout wouldn't fit. But I made up these plans, and who knows? Someone else might be interested in them. Most are built on a 36x78" hollow-core door, which is just about the largest door you're likely to find at Lowe's or Home Depot. I also designed a few layouts for a 48x48" table as a favor to someone who asked very nicely. Obviously, some heavy compromises are in order to fit HO scale on such small tables. In particular, the 15" minimum radius will drastically limit the rolling stock you can use. But the sacrifice might be worth it if you really want an HO-scale layout in an N-scale space. The track is all Atlas code 100. | |
| . | |
 Plan Name: HO-36x78-01. I actually got started on this plan and had a train running, just before we had to move and I sold all my HO stuff. The front part of the layout serves a team track and a chemical works (I used the Milton A. Corporation kit by Pikestuff, with some tanks and piping from Walthers). The back portion is a peaceful country scene with a bridge over a stream. One possible prototype would be the Skaneateles Short Line, which used GE 44-tonners to deliver carloads from the NYC to a Stauffer Chemical plant near Syracuse, NY.
 |
|
| . | |
 Plan Name: HO-36x78-02. If we remove half of the trackplan above, we can turn it into a British-style layout in which short trains enter the scene, do some work, and return to staging. This plan allows four such trains, which is very generous for such a small space, to serve a passenger station and a couple of small industries.
 |
|
| . | |
 Plan Name: HO-36x78-03. This isn't really a loads-in/empties-out plan, but you can operate it that way. Loads get pushed into the mine and removed via the long outside branch; empties go in and out via the shorter inner curve. A long spur to a freight house and a small interchange complete the scene, along with some mountainous scenery.
 |
|
| . | |
 Plan Name: HO-36x78-04. Here's a figure-8 plan to keep a switcher occupied all day! The interchange track at top center feeds three industries, and two grade crossings make this layout look like a very busy place.
 |
|
| . | |
 Plan Name: HO-36x78-05. Making a two-level layout in a tiny space is hard. Grades eat up a lot of space. This one uses the Atlas pier set to secure grades of about 3.2%, and almost all of the track is on the grades. This might be a good starter layout, or it could be a nice demo layout.
 |
|
| . | |
 Plan Name: HO-36x78-06. If you'd rather work on scenery than structures, then this plan might punch your ticket. It's a country scene, with the tracks crossing a river on a variety of bridges. If you wanted to operate on this layout, then think of it as a bridge line (pun intended) -- your engine would pick up cars on the lower, open-ended interchange with Other Railroad #1, take some laps, then spot them on the other interchange that crosses your main line. Then go the other way later in the day, when Other Railroad #2 has spotted some cars on the crossing interchange so you can deliver them to Other Railroad #1.
 |
|
| . | |
 Plan Name: HO-36x78-07. This plan is set by the seaside, and it can accommodate two trains at once. They have to take turns crossing the bridge over the estuary, and each has its own industries to switch. If you don't like the seaside, then set this plan on a river estuary, or over a dry wash in the Western US.
 |
|
| . | |
 Plan Name: HO-36x78-08. If you're from the school of thought that says, "It's not a real layout unless it has a yard and a turntable," even on a tiny layout, then here you are. The yard and the turntable and roundhouse occupy most of the square footage, but I managed to include one industry and an interchange track (which could become a second industry if you prefer).
 |
|
| . | |
 Plan Name: HO-36x78-09. If you like some switching with your continuous running, here's your plan. You get three good-sized industries, a runaround track, interchange, and room for some scenery. You can't ask for much more on such a small train table. Well, you can ask for more, but you probably won't get it.
 |
|
| . | |
 Plan Name: HO-48x48-01. Someone asked me for ideas for a 4x4' HO layout, and while I don't usually do custom plans for people, I was intrigued by the possibilities. This plan emphasizes switching, with two industries, an interchange, and a very small yard. The mainline isn't much more than a circle, because you can't fit much more than a circle onto a small square table.
 |
|
| . | |
 Plan Name: HO-48x48-02. This is primarily a demo layout, although it might make a nice beginner's layout as well. It has one industry on a long, winding branch, an interchange track, and lots of room for scenery.
 |
|
| . | |
 Plan Name: HO-48x48-03. By turning the tracks at a 45-degree angle, I actually fit an oval of track (as opposed to a circle) onto a 4x4' table. It's a busy oval, too, with three industries and interchange. I drew some country scenery outside the oval, but I think this layout would look better as a city or industrial-park scene.
 |
|
| . | |
 Plan Name: HO-12x72-01. Here's a switching layout that's six feet long and only one foot wide. The interchange track at lower right serves five different industries, and serving them isn't simple. The right-side tail of the only runaround track is also a spot for an industry, and the tail tracks are long enough for a switcher, but not an engine with a car, so runaround moves are something you may have to plan several moves in advance. Serving the industry at lower left is a puzzle you'll have to learn how to solve.
 |
|
| . | |
 Plan Name: HO-06x96-01. Here's another switching layout that's eight feet long and only six inches wide. The interchange track at lower left serves five different industries -- the rerailer in the middle is a team track for unloading boxcars and reefers. The long industry at upper left has spots for multiple cars, so switching this layout can keep you busy.
 |
|
| . | |
![]()