Family |
The Trains |
Wargames |
Mike's Stuff |
Heaven? |
- | E-mail me |
My Games |
R C R |
Ogre/GEV |
My Games 2 |
Pirates |
- | Nerf Wars |
Family |
The Trains |
Wargames |
Mike's Stuff |
Heaven? |
- | E-mail me |
My Games |
R C R |
Ogre/GEV |
My Games 2 |
Pirates |
- | Nerf Wars |
| I. Downloadable Files | IV. Game Markers | VII. Suggested Ship Miniatures |
| II. Rules Clarifications | V. Alternate Ship Record Sheets | VIII. Tactical Tips |
| III. Designing Spaceships | VI. Fair Battles | - |
One of the most wonderful discoveries I've made on the net is a free set of space wargame rules called Red Chicken Rising. These rules were written by David Ferris, and are available at his web site, irvania.com; follow the "Old Game Stuff" link. The rules are meant for miniature spaceships and free-form movement, but can work with counters and/or hex maps with little modification. The game is simple without being insulting, it plays quickly, and it's a lot of fun. There are some silly touches, but "serious" gamers can ignore them without changing the game's flavor.
This game, and Ferris' other work, has affected my own site in several ways. By showing that wargames don't have to be complex, he inspired me to write my own EasyStar, the first of many uncomplicated wargames I've created for public consumption. And by showing that wargames don't have to be 100% serious, he bears some of the blame for my own Space Colony Cheeses and Hack & Sack New Jersey. Both of these games also have event tables that bear a more-than-accidental resemblance to the tables in Ferris' Napoleon at Chattanooga.
So what's the point of this page? Well, I can't find any references to RCR anywhere on the net, aside from Ferris' own site, and that's a shame. If your tastes in gaming are like mine, there are times when you don't want to fuss with movement vectors and power factors -- you just want to blow things up. RCR is perfect for those times. It's also a good way to introduce young people or non-gamers to the hobby. And, as the author himself intended, it lets you use all kinds of ship minis in battle against each other. But Mr. Ferris is no longer actively supporting his games, as he has turned his energies in other directions. So, as a public service to the gaming community, here are my own additions and clarifications to RCR, which should make a good game even better, or at least a little more accessible.
I have permission from David Ferris to run this page. Everything on this site is subject to his copyrights. He has given permission to download and copy his game, but if anybody tries to make any money off his stuff or my additions
to it, you'll be in trouble with him, and I won't be very pleased, either.
This includes the alternate ship-design spreadsheet, the game markers, the new ship record sheets, and the ship designs for new alien races. All these are
described elsewhere on this page.
Section 6.3 of the rules says that the rammer and rammee suffer ten and three hits respectively on the Hit Location Table. Forms B and C say they take special damage hits. Again, I think the forms are wrong, and the ten/three hits are on the normal damage table.
If you wonder how two ships locked in contact could keep going straight through each other on their next move, remember we're fighting in 3-D space. One ship can pass over or under the other.
Always assign damage to fighter squadrons in the way that takes out the fewest number of fighters, or does the least amount of damage. For example, if a fighter squadron has lost one or more torpedoes to battle damage, and then loses a fighter, assume that the wrecked fighter had already lost its torpedo, so the fighter squadron doesn't lose another torp in this case. Or if a squadron takes both a crew hit and a propulsion hit from the same torpedo, treat both as hits on the same fighter, not on two different fighters. A beam attack that does multiple hits must be treated as hits on different fighters, though.
If a ship's crew is wiped out by Dweasel Diplomacy, is that ship immediately out of the game, or is the damage applied at the end of the turn? I asked Dave, and he said to treat it like any other damage, applied at the end of the turn.
Therefore, when every ship starts the game with a crew of ten or less, bridge hits do only 1-5 points' damage (roll a d10, and subtract 5 if the result is greater than 5). This will make the ships last a little longer in small-fleet battles.
A missile volley consists of 1-4 missiles. It has no crew, propulsion equal to the number of missiles in the volley, very high speed, no shields, no CAG, no beams, and 1-2 torpedoes (which cannot be fired). Their Targeting value is critical, because they have to ram their target to hurt it. Targeting cannot exceed 8 or the highest Targeting in its fleet plus two, whichever is lower. A missile volley also suffers damage similar to a fighter squadron -- a hit on crew or propulsion reduces the number of missiles in the volley by 1. The cost of a single missile is 50 per torpedo carried; a three-missile volley with two torps per missile would cost 300 points.
When a missile volley reaches its target, rather than making to-hit and shield rolls, make a ramming attempt for each missile in the volley. A missile that misses its ram is lost. Each missile that hits does damage as if it scored hits with all its torpedoes. Such hits don't have to roll to-hit and can't be stopped by shields. Missile hits occur in the movement phase, but treat the damage as normal battle damage; don't apply it until the end of the turn.
A volley of boarding torpedoes follows the same rules as a missile volley, except that it carries no torpedoes and has a CAG rating, typically 2 per boarding torpedo in the volley. Its crew will be the same as its CAG, and if one is hit, both are reduced. Because boarding torpedoes have to be bigger than missiles to carry and protect their fragile cargo, a volley usually consists of two torpedoes, and can never be more than three. Boarding torpedoes can also carry up to 2 units of shielding. Such torpedoes can be launched from either a fighter carrier or a missile ship, where each individual torpedo takes up as much space as 1 fighter or 2 missiles. The cost of a boarding-torpedo volley equals the total CAC of that volley times 75.
If a boarding-torpedo volley successfully rams an enemy ship, it stays stuck to that ship until one or the other is destroyed. For the sake of simplicity, we'll assume that the torpedoes always score hull hits, so they do no damage when they ram. Each turn, the Marines from the torpedoes wage CAC against the ship they've boarded. Because CAC always causes casualties to both sides, it's a matter of time before the Marines are wiped out, unless they can wipe out the boarded ship's crew first. If the Marines win, the boarded ship is finished -- there's no way the Marines can figure out how to work an alien ship's controls in time to affect the battle. Remove the ship from the game at the end of the turn.
(The other page of the spreadsheet shows all the "official" ships in the Daveway's document, so you can see how they were built and where their costs came from. Each ship is shown in a modified version of the ship-design spreadsheet.)
You create a spaceship design by filling in the gray boxes; the blue ones are figured by the spreadsheet. You will quickly notice that 80-90% of a ship's cost is in its weapons. It's tempting to drop a die of beam strength, and use the points for impenetrable shields and huge crews to make your ship unstoppable. See the following section ("Ground rules for ship design") for some reasons why you shouldn't do this.
If your goal is a ship with a given set of values, then plug in those values, and see if the resulting point cost is in line with what you're willing to "pay" for that ship. If you're striving for a ship with a fixed point cost, you'll have to fiddle with the values quite a bit, and you'll probably have to make some compromises. Keep the following basic facts in mind:
If you'd rather, I offer a variation on this spreadsheet in my downloadable file, called "Autoform.XLS," with the following improvements:
In all cases, you can use lower values than specified. Adding one to the crew or propulsion won't be a design-killer, but don't go higher unless you have a very compelling reason. Shields, in particular, should stay at the "default" values. Targeting and weapons values vary by race, not by ship class, so there are no limits on those.
Shield markers go on your ship's base to show that one or more shield generators have been knocked out, and the ship has only front or rear shields, or none at all. These markers are mentioned on page 5 of the rule book; now they really exist. The black arrow shows the ship's direction, and the red hemisphere (if any) shows which end is protected by the remaining shield generator.
Turning markers go on your ship record sheet to indicate steering damage. Now, instead of having to erase and write the steering-damage codes in the little box, just put the appropriate marker there instead. Much neater, much cooler-looking, and usually quicker.
Bridge-hit markers go on a ship that took a bridge hit during the previous turn, to remind you that this ship has to move exactly as it moved last turn. Remove the marker at the end of the turn.
Fighter markers show you which fighter squadrons are aboard which carriers. A blank space on each marker lets you write in the squadron's name or number. Place them anywhere on the carrier's record sheet until the fighters launch; then set them aside. If a squadron lands, put its marker back on that carrier. Now you can tell the status of your carriers at a glance.
Carrier damage markers show that a carrier has taken one or more flight-deck hits, and it cannot support its full complement of fighters.
Form D, as I call it, resembles Form C in most ways, except you have to write a little smaller here and there. By reducing "dead" space in the middle of the form, shrinking a few boxes that don't need to hold much info, and rearranging a field or two, it gains the following advantages:
Form E is a cross between my Form D and the original Form B, and may be the best of all possible worlds:
| Race | 5000-Point Fleet | 10,000-Point Fleet |
|---|---|---|
| Generics | CL + 3DD = 4863 CA + CL + DD = 5107 5DD = 5190 |
2CA + 3CL = 9887 BC + CA + 4DD = 9944 BC + 2CL + 3DD = 10084 BC + CA + 2CL + DD = 10328 |
| Bad Days | 3CL = 4602 2CA = 4838 CA + 2CL = 5487 |
BB + CA + 2CL = 9539 CA + 5CL = 10089 BB + 4CL = 10188 |
| Dweasels | CL + 2DD = 4938 | BC + CA + CL = 9932 BC + CL + 2DD = 10053 |
| DRS Earthies | CA + 2DD + 2FF = 4963 5DD + FF = 5034 2CA + DD = 5107 |
BC + 2CA + DD = 9615 BC + CA + 3DD + FF = 9843 BC + CA + 2DD + 3FF = 10000! Hah! I did it! |
| Irvanians | 2Ftr = 4720 Cvt + Ftr = 5430 | BC = 9290 CA + Cvt = 9711 |
| Undead | CL + 4DD = 5063 | BB + BC + 2CA + CL = 9863 2BC + 2CL + 3DD = 9996 |
| Squishies | CA + DD = 4872 3DD = 5163 |
BB + 3DD = 9869 BB + CA + CL = 10024 |
| Fishroids | CA + DD = 4734 CA + CL = 5209 |
BC + CL + 2DD = 9911 BB + 3DD = 10042 |
| Bowsers | 2CL = 5150 | CA + CL + 2DD = 9740 |
| Fyr-Baal | 3DD = 4758 2DD + 2FF = 4928 2CL + FF = 4982 |
BC + CL + DD + 2FF = 9828 BC + 2DD + 3FF = 10240 |
| Robots | CA + 2DD = 4788 2CA = 4808 |
BC + CA + 2CL = 9978 BC + CA + CL + 2DD = 10289 |
| Budgies/Ducks | CA + DD = 4895 3DD = 5145 | BC + CA + 2DD = 9920 |
| HAPpies | 4DD = 4896 CA + 2DD = 5036 |
BC + 3CL = 9711 BC + CA + CL + DD = 9857 |
| Alfs | 3CL + 2DD = 4826 2CA + DD = 5002 |
BC + 2CA + 3CL + 2DD = 10001 (pretty darned close) |
| D'Orques | CA + CL + 2DD = 4975 5DD = 4975 CL + 4DD = 5167 |
BC + 2CA + 2CL + DD + FF = 9971 |
To get your feet wet in the world of spaceship miniatures, look no further than Studio Bergstrom. He makes several dozen styles of spaceships, fighters, and space stations. Most of the ships cost US $1.00 at this writing; the stations go for a bit more. Yes, they're small -- most of them range in length from 0.75"/19mm to 1.25"/31mm. But the detail is pretty good on some of them, and you can easily get two 12-ship fleets for US $24, plus shipping. Or you can use any line of miniature spaceships. I've categorized four common lines below, to show how it's done.
| Using Commonly-Available Miniatures in RCR | ||||
|---|---|---|---|---|
| RCR Ship Type | Full Thrust | Noble Armada | Space Dreadnought 3000 | Studio Bergstrom |
| Corvette | Scout or Corvette | - | . | Falcon Frigate |
| Frigate | Frigate | - | Patrol Ship | FED Frigate |
| Destroyer | Destroyer | Explorer | Destroyer | White Dwarf |
| Light Cruiser | Light Cruiser or Escort Cruiser | Frigate | Light Cruiser | Wedge Fighter |
| Heavy Cruiser | Heavy Cruiser | Galliot | Heavy Cruiser | Sing-On |
| Battle-Cruiser | Battle-Cruiser | Destroyer | Battle-Cruiser | Nernie |
| Battleship | Battleship | Cruiser | Battleship | Bri'Anoch or Draguntaz |
| Super-Battleship | Superdreadnought | Dreadnought | - | Galactic Battleship |
| Light Carrier | Light Carrier | League Escort | - | E-Fighter |
| Carrier | Battledreadnought | Lander | - | - |
| Super-Carrier | Fleet Carrier | - | Fighter Baseship | Galactic Carrier |
| Fighters | any fighters | - | Fighter Swarms | - |
As for painting, there are many Internet articles on the subject. If I can do it, you can. Keep in mind that your minis don't have to have museum-quality paint jobs if you aren't so inclined. After all, they're just game pieces. If you can tell which ship belongs to which navy, that's all you need. My own paint jobs aren't much more than color codes.
| Some Sample Fleets | |
|---|---|
| The Wholly Roamin' Empire, my "personal" fleet. Ships are mostly Noble Armada, with some Games Workshop, Studio Bergstrom, and scratchbuilt thrown in. | 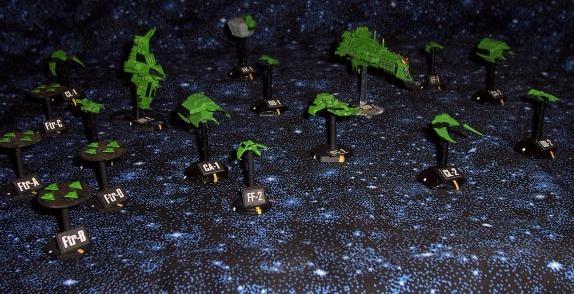 |
| The FMSR Coalition, a race of lily-livered cowards. Ships are the same sources as above, with more scratchbuilds. | 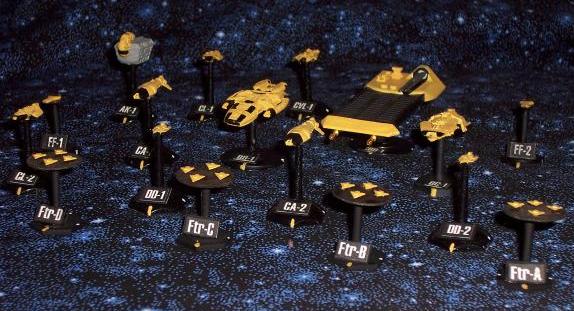 |
| The Feds, the ultimate in space-going lawful good. Ships are from Zocchi and Amarillo Design Bureau. | 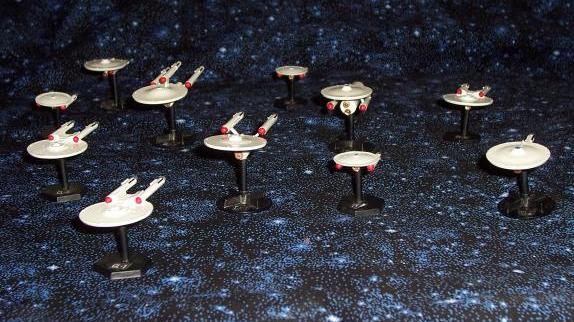 |
| The G'Tarrs, my friend Ed's personal fleet. All ships are from Kallistra. | 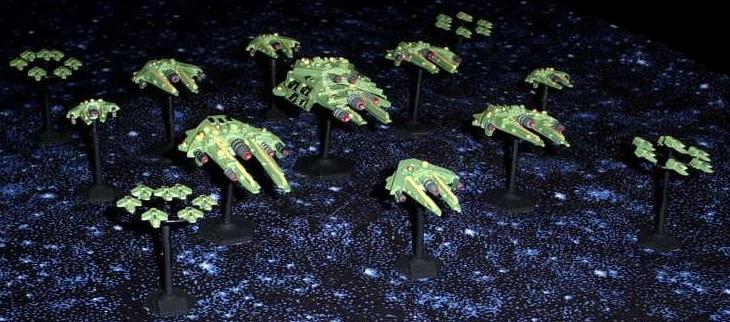 |
In a battle, each fleet is going to suffer a few really damaging hits (magazine explosions, jammed steering, and the like), which will be more or less equally divided among the ships in that fleet. So a fleet with a greater number of ships will spread those hits more evenly, and each ship will take proportionately less damage. With a small fleet, the nasty hits will all pile up on a couple of ships. Thus, a fleet with a higher number of lower-cost ships will usually defeat a smaller fleet of higher-priced ships.
This doesn't mean you should send a pack of frigates up against a super-battleship. The big ship's heavy shields will be the equalizers, and the frigates will suffer badly. I'm talking about, say, six 1000-point light cruisers against four 1500-point light cruisers. The costly-ship fleet will have a slight advantage in weaponry, but the costly cruiser is as easy to destroy as the cheap one. Losing a 1500-pointer costs its owner 1/4 of his total firepower, while losing a 1000-pointer robs its owner of only 1/6 of his firepower. The cheaper fleet can repeatedly trade ship-for-ship and gain a greater advantage each time.
If you want to quickly reduce your enemy's firepower, shoot his smaller ships first. Two dice worth of beams on a destroyer can hurt you just as much as two dice of beams on a battleship, but the destroyer's beams are much easier to hit because its shields are weaker; and you can silence an entire destroyer more easily because its crew and propulsion are smaller. A few good hits, and a destroyer or frigate is toast; those same few hits would only annoy a battleship. Once the small ships have been taken out, you've reduced the total enemy firepower by a sizeable chunk, and you can concentrate on his big ships at your leisure.
If this seems unsporting, remember that the purpose of escort ships is to protect the big ships. By hitting the little guys first, you're allowing them to fulfill their purpose in life.
A ship with shorter-than-average weapons range should race toward the enemy at flank speed. Every turn your ship spends out of range is a turn where that ship contributes nothing to your war effort. Worse, it may take serious damage or be destroyed before it can get a shot off. This is even more true if you're counting on torpedoes to win your battle for you.
But if you have a ship with longer-than-average weapons range, it makes no sense for that ship to rush into battle. Let it hang back, blasting the enemy from a range where they can't hit back at it, while your shorter-ranged ships make their headlong rush. Your long-shooter will dish out as much damage as it would at closer range, but take no damage at all in return.
If it bothers you that these separate maneuvers will mess up your neat formations, you're in the wrong hobby. Neat formations are good in cross-stitching. In war, you use what works.
Fighters are a poor value. If the enemy gets a crew hit on a fighter, he also gets a propulsion hit, a beam hit, and a torpedo hit thrown in for free. Their one advantage is that, with their high speed, they can dash into torpedo range before the enemy can pull away. If you must use fighters, try to reload their torpedoes at your carriers as quickly as possible, rather than buzzing them around, inflicting pinpricks with their little beams until they're wiped out. Otherwise, you're better off spending your points on a ship with some staying power.
Dweasel diplomacy, CAC, and ramming all have the wonderful property of ignoring an enemy ship's shields. So these are excellent ways of nibbling at a heavily-shielded ship. A 5-point beam weapon with a to-hit of 4 has a 10% chance of scoring one hit on an enemy ship with shields of 8, but if the attacker's Targeting is 4, it has a 20% chance of causing a crew casualty on that same enemy through DweasDip. Small ships can gang up on a bigger foe to combine their CAG scores for similar results.